"What's in a name? That which we call a rose

By any other name would smell as sweet."


That which we call art, by any other name would be as wonderful. What is true 'art'? Have I earned the title of artist? Or am I a poser? Whenever someone asks me what I 'do', my instant answer is artist. But when I think of what an artist is, I picture someone living in a funky loft apartment with exposed brick, paint all over their clothes. Going for coffee at the cafe down the street every morning. Thats not me. I'm a mom with a messy house. My coffee is folgers instant coffee. But I am an artist, no less. I feel that anything one creates with their own hands is art. Painting, drawing, crafts, and cooking. Creating a garden is a living work of art, always changing. Welcome to my imagination. I will share with you my version of art, using every medium available.


Tuesday, January 25, 2011

My Craft Room Before

This is the -before- picture of my craft room. I am not changing it because I dislike it, but because the roof sprung a leak from our tornado. It was only dripping, but now that it snowed, its more like a waterfall! The chair was $3 at a yard sale, and I painted and reupholstered it. The door across the back is an original door from my house, which was built in 1937. I loved it too much to throw it away when we remodeled. It is skinnier than a modern door, and the door knob is so tiny and cute. I leaned it against the garage outside for a while, and for once,being a procrastinator payed off this time! Perfectly shabby chic, with no effort at all. (Besides convincing my hubby not to throw it out!)

I lightly sanded it to get the loose paint chips off. Then I spray painted the whole thing with a clear coat to seal it in. The design I painted is similar to the paper I chose to accent the room with. I used a paper plate and a lid to a cup to get the circles. I free handed the rest. 

I keep my beads in baby food containers, they stack nicely and its easy to see whats there. I'm always more creative when everything is spread out in front of me.

This shelf was recycled from the old fireplace mantle. I painted it with acrylic paint, then a crackle coat, and then more paint. Its the first crackle project I've done, and it won't be the last!  I loved the anticipation of not knowing exactly what it would look like, and peeking at the crackling in progress.

Here is the sad part. Just one of the many leaky spots now in the ceiling. But, it is soon to be fixed, if the weather stays mild. So there will be a Craft Room -After- coming (hopefully) soon!

Thursday, January 20, 2011

Condolance Card

This card design can be an impressive and quick card if you use coordinating paper. You could also dig out the scraps and really get creative, depends on your time frame. This card is made from Stampin' Up paper.
 1- Start with you standard card size, 4 1/4 x 5 1/2 (green). This is just a sheet of card stock, not folded.
 2-Then cut a piece (green w/ flowers) that is 4 x 5 1/4.
 3-Next, cut one that is 4 x 3 3/4 ( blue w/ flowers). This size gives you room for a 1 inch flap, score and fold at 2 3/4.
4-The yellow strip is 4 3/4, score and fold on the 4 inch mark, giving you a 3/4 inch flap.
5- Now, cut the last piece that is 3 3/4 x 1 3/4, to stamp your sentiment on. I suggest stamping your sentiment on before assembling card.
6-Cut 2 lengths of ribbon to create the bow. You can use 2 different colors, as in the sample, or stick with 1 for a monochromatic look.
 While you are gluing the card together, remember to put the ribbon in place. So start by attaching the blue flap (3) to the green flower paper (2) on one side, and the yellow flap (4) on the other side. Then place one ribbon between the blue flower (3) and green card stock (1), and the other ribbon between the yellow (4) and green (1). Glue into place. Glue white paper (5) to yellow (4), running ribbon between them. Attach a 3-d element, like the flower in the sample.      

Monday, January 17, 2011

Valentine's Paper Crafts

I made this with a sheet of scrapbook paper and a few quotes I found and printed off the Internet. I tore the paper up,  and modge podged it,  along with the quotes, to a small paint can. The can is to put love notes in. Unfortunately, I haven't filled my can up yet, but its still fun to make.
The small tin is an Altoid tin, and I used modge podge on this, too. I used some acrylic paint and a border sticker to decorate the edges of the tin. I used a corner punch to round the corners of my business cards, and store them in here.

This card has a fun 3-d element, and its a great way to use scraps of ribbon. I made one with all different colors of bright ribbons on a black background, too. Corsets seem very romantic to me, but I bet they didn't seem that way if you had to wear them every day!  

I made these at a make-n-take at my mom's house. The die cut is a Stampin Up die called Top Note. I got the black layer by cutting carefully around the scrap from a black die cut.  


This is a quick and easy card, great for a girlfriend's V-day card.  I love this set, Fabulous Flowers, a retired Stampin Up set. You can use any big flower stamp with more than one row of petals. Make the flower pop! Stamp it a few times, and cut out layers. Layer them, glue them directly to each other, or for more depth, layer them with adhesive foam tape. I added some sparkle by putting a dot of stickles (glitter glue) on the tip of each petal. You can add even more to it by curling the edges of the petals slightly.

I didn't make this one, but its cute so I  had to share. I don't have a pattern, but you can just add a tab to the side of the hearts. Fold in the tabs, and glue them together to form an open topped narrow box. For an added touch, you can make a little card that fits right into the box. Stamp some tissue paper with a coordinating stamp, add a ribbon handle and some treats.

This was a make'n'take I taught at our store. Its made from a cd envelope. I got the idea off the Internet, and they had a cookie in the envelope. You could also put a mix cd in the envelope, maybe love songs for your Valentine. I decorated the envelope by stamping and sponging. I added a paper tab (the piece in the center with the heart). In the picture it is leaning against a card, just so I could take a better picture.


This scrapbook layout isn't my best work, nor did it take much time. But it was so fun to make, and I love it still. I already had the paint out, and the idea popped into my head. I cut out a large heart from printer paper. I traced it onto the purple shimmery paper. Then I used acrylic paint to go around the pattern a couple more times directly on the paper. I painted the edges of the paper, too. I glued down the pictures, and then journaled around the inside of the heart. Added a few stickers and stamps, and it was done. I usually spend such a long time on my layouts that there is no way I will EVER be able to scrap all the pictures I want to. Sometimes its fun to just go crazy and have fun, and not worry about perfection.

Wednesday, January 12, 2011

Wine Glass Candle

This is my  idea for a place to store the charms when they aren't in use. I got the glasses at the dollar store. There were lots to choose from. Make sure they are heat resistant, you don't want the glass to break while the candle is burning. I bought a pack of small candles, there was even wine scented candles, but I used cinnamon. I also bought a package of wax crystals. It is in the candle making section at the craft store. It is basically powdered wax. I set all the glasses in a row, and poured the wax evenly among the glasses. I preheated the oven to the 'warm' setting. I set the glasses on a cookie sheet, and put them in the oven. It took about ten minutes to melt the wax. I carefully removed the cookie sheet, and then let them cool for a couple minutes. Next, I placed the candle in the middle, and held it there until it stayed, about 30 seconds. I watched them until the wax just barely started to set.   

I sprinkled some of the beads I used to make the charms over the still warm wax. You need to watch closely because the beads won't stick if the wax sets too much. There are a few other ways you could create a candle in a wine glass. I did it this way because it was a last minute idea, and this was the most time and cost effective way.  But, if I had more time and a bigger budget, I would use the candle gel. It has the appearance of a liquid, and you can add any color or scent to it. You could make it look just like a glass of wine! 

After the candle is set, attach all the charms to the stem. Now there is a pretty place to store the charms when they aren't being used. By the way, I have always liked all the wine paraphenalia, but not the wine. The glasses, the racks, the charms, its all beautiful. But the taste of wine is not something that I enjoy. But I recently discovered one that I love. Its called Moscato, and it is very sweet. The lower the alcohol content, the sweeter the flavor. So if you like sweet wine and haven't tried this, you should! Most of the popular brands make it, like Barefoot Bubbly and Sutter Home. Leave a comment if you have a favorite wine, I'm just discovering the world of wine. 

Tuesday, January 11, 2011

Wine Charms

I made these wine charms for most of my friends and family on my Christmas list. They were fun and inexpensive, both important qualities when you are making a lot of something! You don't need to be a bead expert to assemble the charms, you just need one tool,  flat nose pliers (pictured below).   

Start with an earring wire like this one. They come in gold, silver, copper, and sometimes you can even find other colors.  Make sure the beads and charm are waterproof so you can wash them between uses. Thread your beads and charm onto the wire. Get creative with your charms. You can personalize the charms with monograms, favorite colors, or themes. For example, if  you are giving the charms to someone who loves the ocean, use seashell charms. You can find charms in many different themes, if it isn't at your local craft store,  check online.  Browse the internet for inspiration. You can use paper punches and a jump ring to create disposable charms to match the theme of your party. Add to a paper charm by using rubber stamps to dress it up.  

 
These are the pliers I used. It came in a set in the beading section. I also have another that I stole  borrowed from my hubby and it works just as well. The difference between the pliers is that this one is smother and more gentle on the metal.

After adding your beads, bend the end of the wire up like this. Make sure to do this AFTER adding the beads, it will be impossible to put the beads on with it bent. You can straighten out the wire if you missed a step, but its hard to make it look smooth again. If the wire doesn't stay in the loop pull it out a little to add some tension. 

This is my idea for a pretty place to store the charms when not in use. Its a whole different project, and the instructions are soon to come. You can again search the internet for ideas on how to package them. There were lots of cute ideas, including punching holes along the bottom of a card and attaching the charms. Another idea I liked was to use little round tins with windows in the lid. You can get these at the craft store. I found tiny boxes at the Dollar Store, made for small wedding favors, that came in a pack of 12. I use those little boxes for giving earrings away, too. They are the perfect size.  


Saturday, January 8, 2011

CD Folder Album

These albums are really fun to make. They make great gifts, too, and go together much quicker than a traditional album. My mom made this album for my daughters, after we went to the dinosaur museum.  You can simply pick a set of paper with matching stickers, tabs, etc. Or, this can be a fun challenge to use up all those cute little scraps you were saving for the perfect project.  

You start with cd folders like this one. They are from ULINE.
They are called CD Literature Folders. They come in a case of 125 only. But don't worry, you can split it with friends. Or hang on to them for yourself, you might be suprised how addicting they are! You can make the album whatever size you like. Three to four folders works great, though.  Measure the folder,  open, and cut out one paper this size for every two folders. Use these to join the folders, glue the paper to the back of one folder and to the front of the next.  To make the spine, measure the width, and leave enough to wrap around the edges.  If  you can find fabric paper, this works the best. It holds its shape, yet bends with the book as it is looked at. Next, you will cut the paper for the pages. There is lots of room for creativity and expanding the size of your book by making flaps (see below).  There are two ways to color the edges of the folders. (They will show a little bit after you attach your paper.) You can color them now with sharpies or chalk ink matching the paper you will be using, for a clean look. Or, you can paint them after the paper is added, for a more shabby chic look.


You can see that longer sheets of paper were used here to make flaps. The pockets all have tags in them, too. As you are assembling your book, think about where you might like to add 3-d elements like brads. This is sometimes easier to do before attaching the paper. Be sure to add some funky edges here and there with your punches or scissors! 


You can see more pages with flaps here, one open and one closed.

This is the album I am working on right now. It will not be truly finished for a long time, as I am using it for a journal. I am filling it with my thoughts on spirituality and religion. Whenever I have a thought, quote, or even a picture, I will tuck it somewhere in the book. You could also use them one at a time to make a special birthday card. Maybe a love song mix cd for Valentine's day would be fun, a homemade cd in a handmade case. Have fun!

Thursday, January 6, 2011

Camoflauge Cupcakes


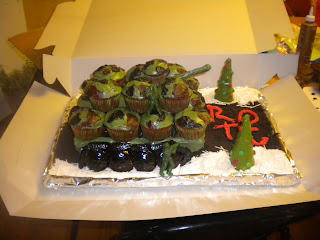
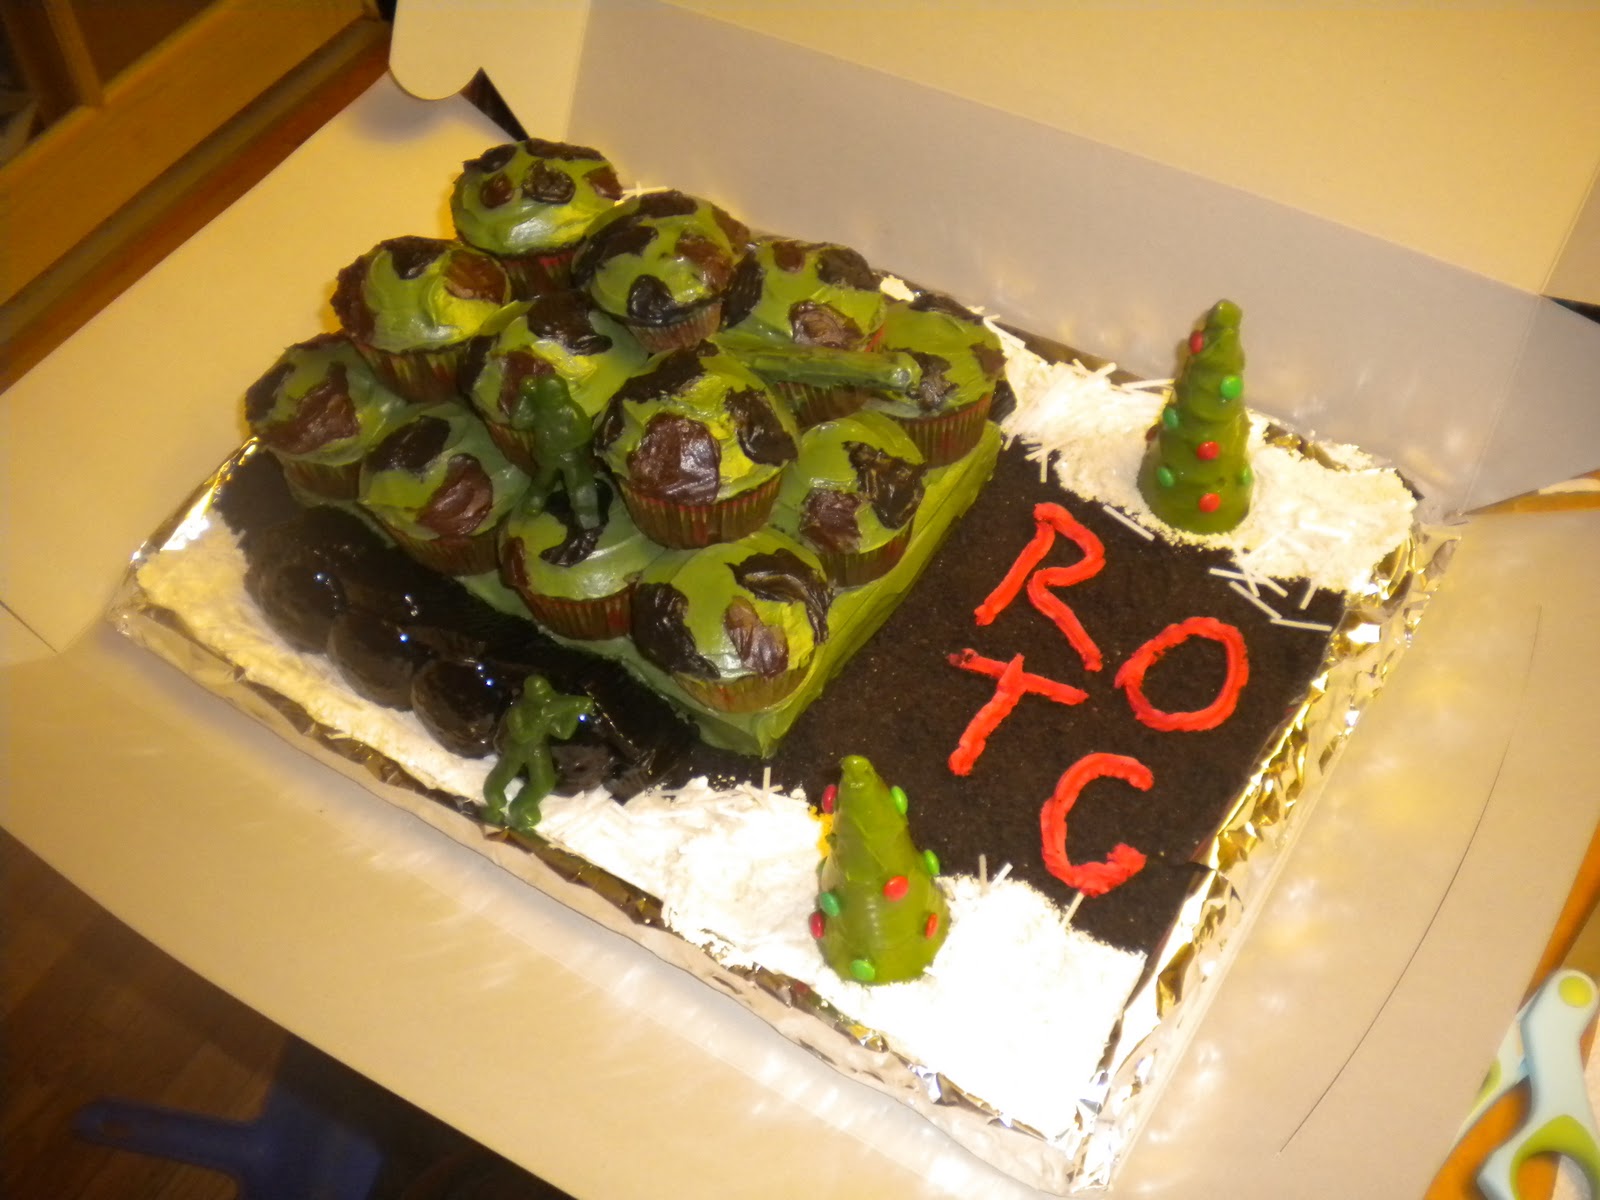
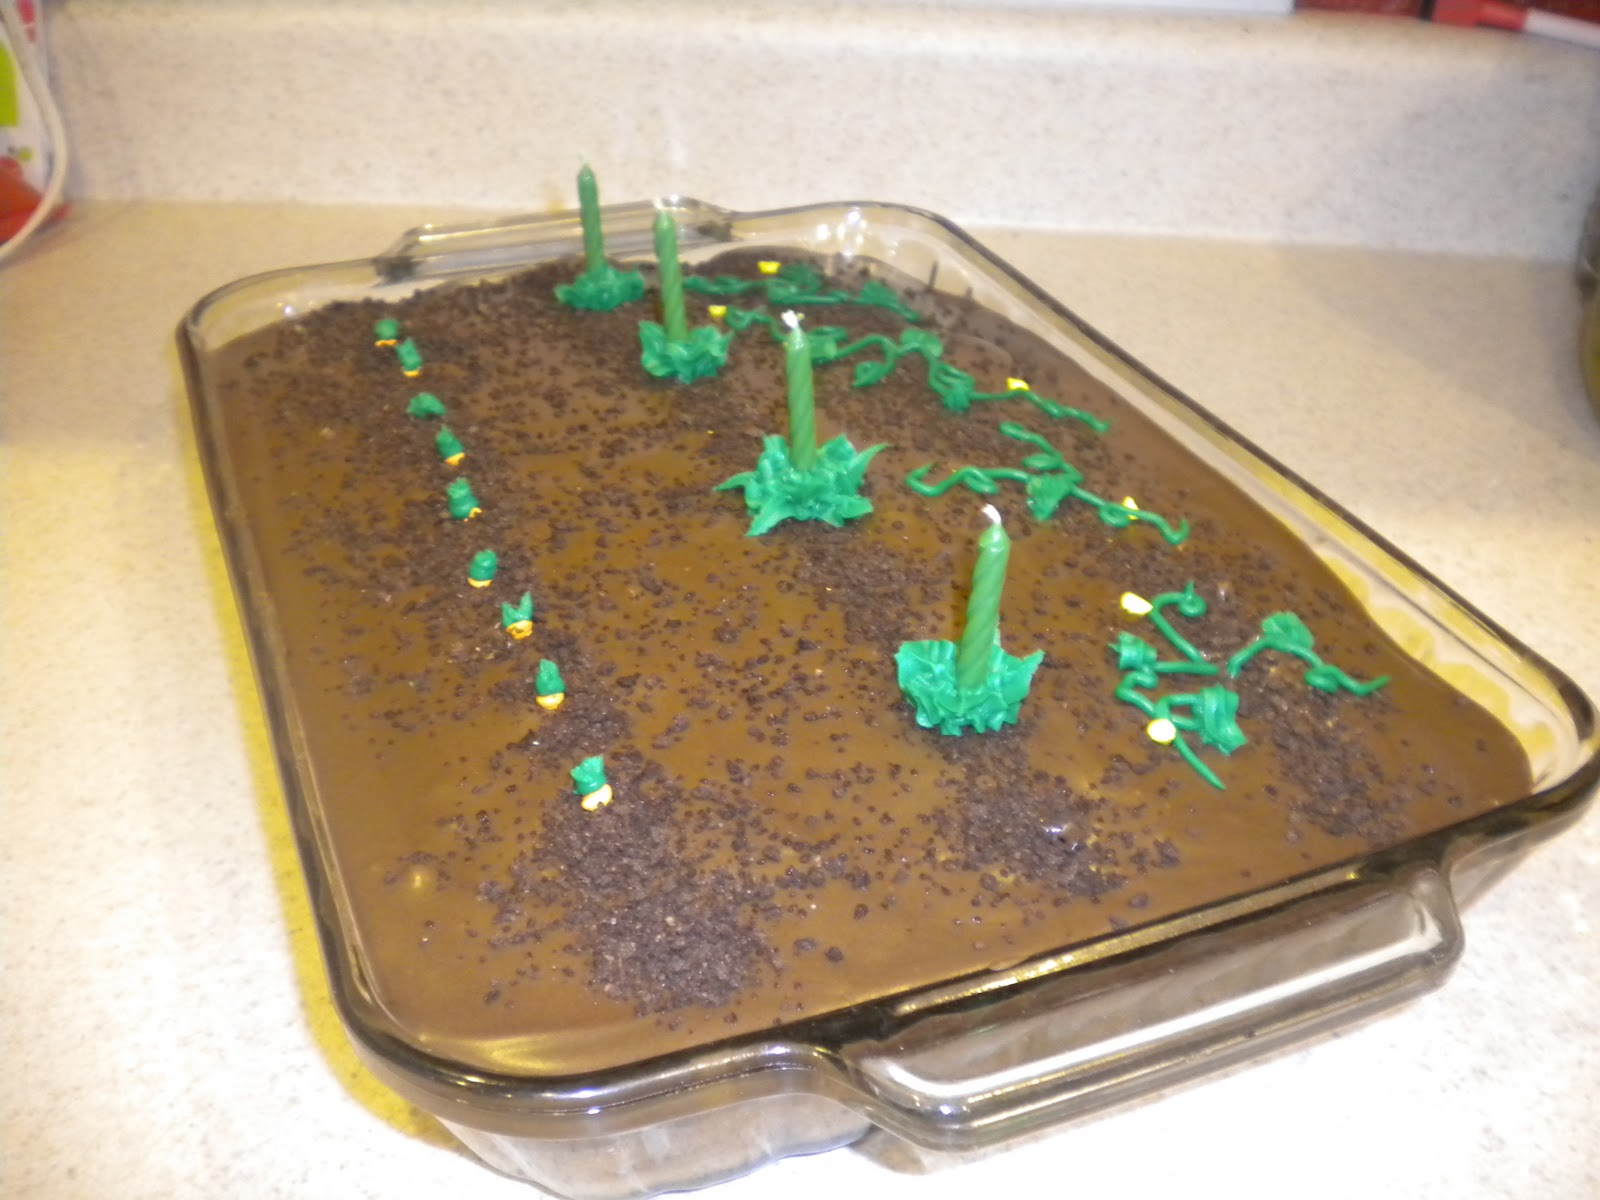
This is another one of my sweet creations. I made this for the ROTC Christmas party. I first went shopping at Candytown. I got the gummy army men, tire treads, and snow there. I baked 2 dozen regular and 1 dozen mini cupcakes. This gave me some extras to practice frosting.  To make the landscape, I wrapped cardboard with tinfoil. I rolled up an extra piece for each side,  taped it on each end, and wrapped one more piece of foil over it. This created a raised edge so the snow didn't slide off the sides. Then, I ran oreos through the blender, first vanilla cookies, then the chocolate. I sprinkled them onto the tray, creating a road with them. Then I sprinkled the snow on the vanilla cookie crumbs. Next, I mixed some black food coloring into a can of chocolate frosting. I microwaved it to a liquid, (a tip I learned from Hello, Cupcake) and dipped the mini cupcakes in it. While I let the frosting set, I made a platform out of cardboard, tape, and aluminum foil. To figure out the size I wanted for the platform, I set the cupcakes on the cardboard how I envisioned them once decorated. I marked the edges, removed them, and cut out the cardboard, leaving enough room at each end to make legs, the height of the mini cupcake turned on its side. I folded the ends, taped them in place, and covered it in foil. Then, I frosted the platform. I turned the now cooled mini cupcakes on their sides to make the wheels. I glued the licorice treads on with more black frosting. Next I decorated the regular cupcakes. I made cream cheese frosting, and tinted it with food coloring. I spread the green frosting on the entire cupcake, then added splotches of black and brown to make the camo pattern. After they were frosted and the tank was assembled, I added some Christmas trees for added holiday cheer. These were made by frosting sugar ice cream cones, and sticking mini m&ms on for ornaments.

Jim's Garden Cake

 I made this cake for my father in law. He loves gardening, so I made a garden cake. This is super easy and went together very quickly. Start with any flavor box cake mix. I used butter pecan. Bake according to instructions on box. While the cake was still warm, I used a serated knife to make the rows in the garden. I then poured caramel topping, the kind for ice cream sundays, into the rows.
 Next, I made the frosting. I didn't have the ingredients from the recipe I wanted to use, so I made my own. I melted over low heat a stick of butter and 7 dark chocolate Dove candies. (The small wrapped squares meant for eating, not baking.) When it was all melted, I added a half cup of unsweetened cocoa powder and a pinch of cinnamon, mixed well. Then I poured this into a glass bowl. I added a half brick of cream cheese, blended, and then began adding milk and powdered sugar a little at a time until I had the flavor and consistency I wanted. I made this frosting with more milk than I would normally use, because I wanted a thin consistency that I could pour over the cake. I then poured and carefully spread the frosting over the cake. This is the BEST frosting I have ever made. Next, I sprinkled dark chocolate sprinkles down the rows. I used Wilton icing to make the lettuce candle holders, pumpkin blossom vines, and carrots. The icing comes with shaped tops that screw right on to the can, and it sprays out like easy cheese. There are insructions on the can on how to create different designs. I used the leaf tip and the writing tip. The candies I used to make carrots and blossoms are from the bottle of sprinkles pictured below. The are like candy coated mini kisses. This cake could be  prettier placed on a cake stand before decorating, but I went for the easy transport and less dishes. I served this with butter pecan ice cream. Yum!


Ryan's Cupcakes

I got a book called Hello Cupcake for my birthday last year. This is one of the many cupcake creations I made with instructions from the book and my own touches here and there. I used ziplock baggies for piping the frosting, and a plastic fork and some toothpicks to give it the appearance of paint. It was sooo fun, and very inexpensive, since I used stuff I already had to apply the frosting. It is a basic cream cheese frosting. I used food coloring to tint the frosting. To create shades, I started with a big bowl, and made the lightest color. I then scooped out about 2/3 into another bowl, tinted it a shade darker, and then took about 1/2 of that to make another shade darker.