Wednesday, March 2, 2011
Yummy Coconut!
I want to share a very simple but fabulous recipe I made up for my kids. I'm sure everyone has had the classic p-b-h. Peanut butter, butter, and honey. Well, just swap out the butter for coconut oil. I also made the best brownies ever, by substituting melted coconut oil for the vegetable oil called for. They were delicious, and light and fluffy on the inside, crispy on the outside. Perfect! Coconut oil is very good for you, inside and out. You can rub it straight into your hair for deep conditioning. I discovered it through my new hobby-soap making! (Posts on that coming soon!) I had never seen coconut oil before, but a lot of the soap recipes call for it. And I see why. It is wonderful for your skin, and smells so good. It looks like shortening, but melts instantly when you touch it. I looked all over town, at the Wal-Marts, Target, Albertson's, but couldn't find it. I finally found it at our local health food store, Good Earth Market http://www.goodearthmontana.com/. It is a little pricy, but I bought a $10 membership, and with my member sale price, saved $9.41 It was well worth the membership price. Good stuff, people, you should give it a try!
Monday, February 21, 2011


Friday, February 18, 2011
I'm Beth and I'm an addict.
 |
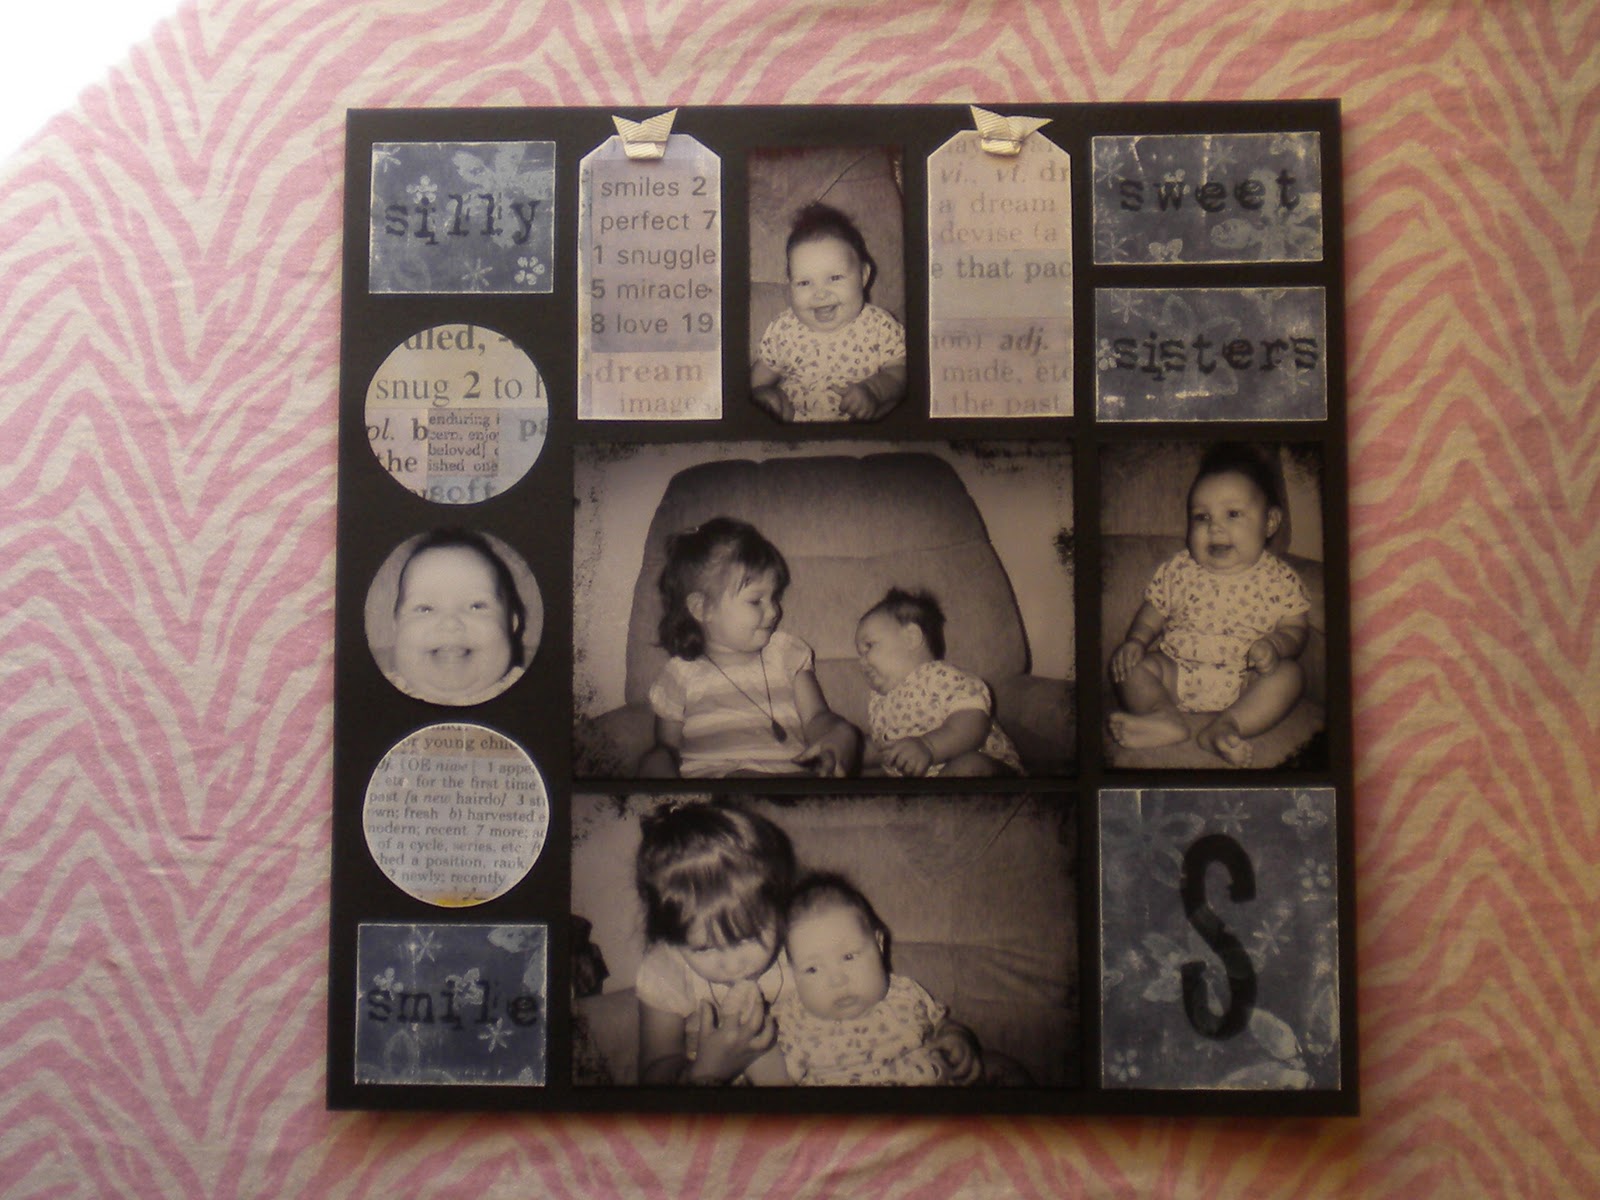
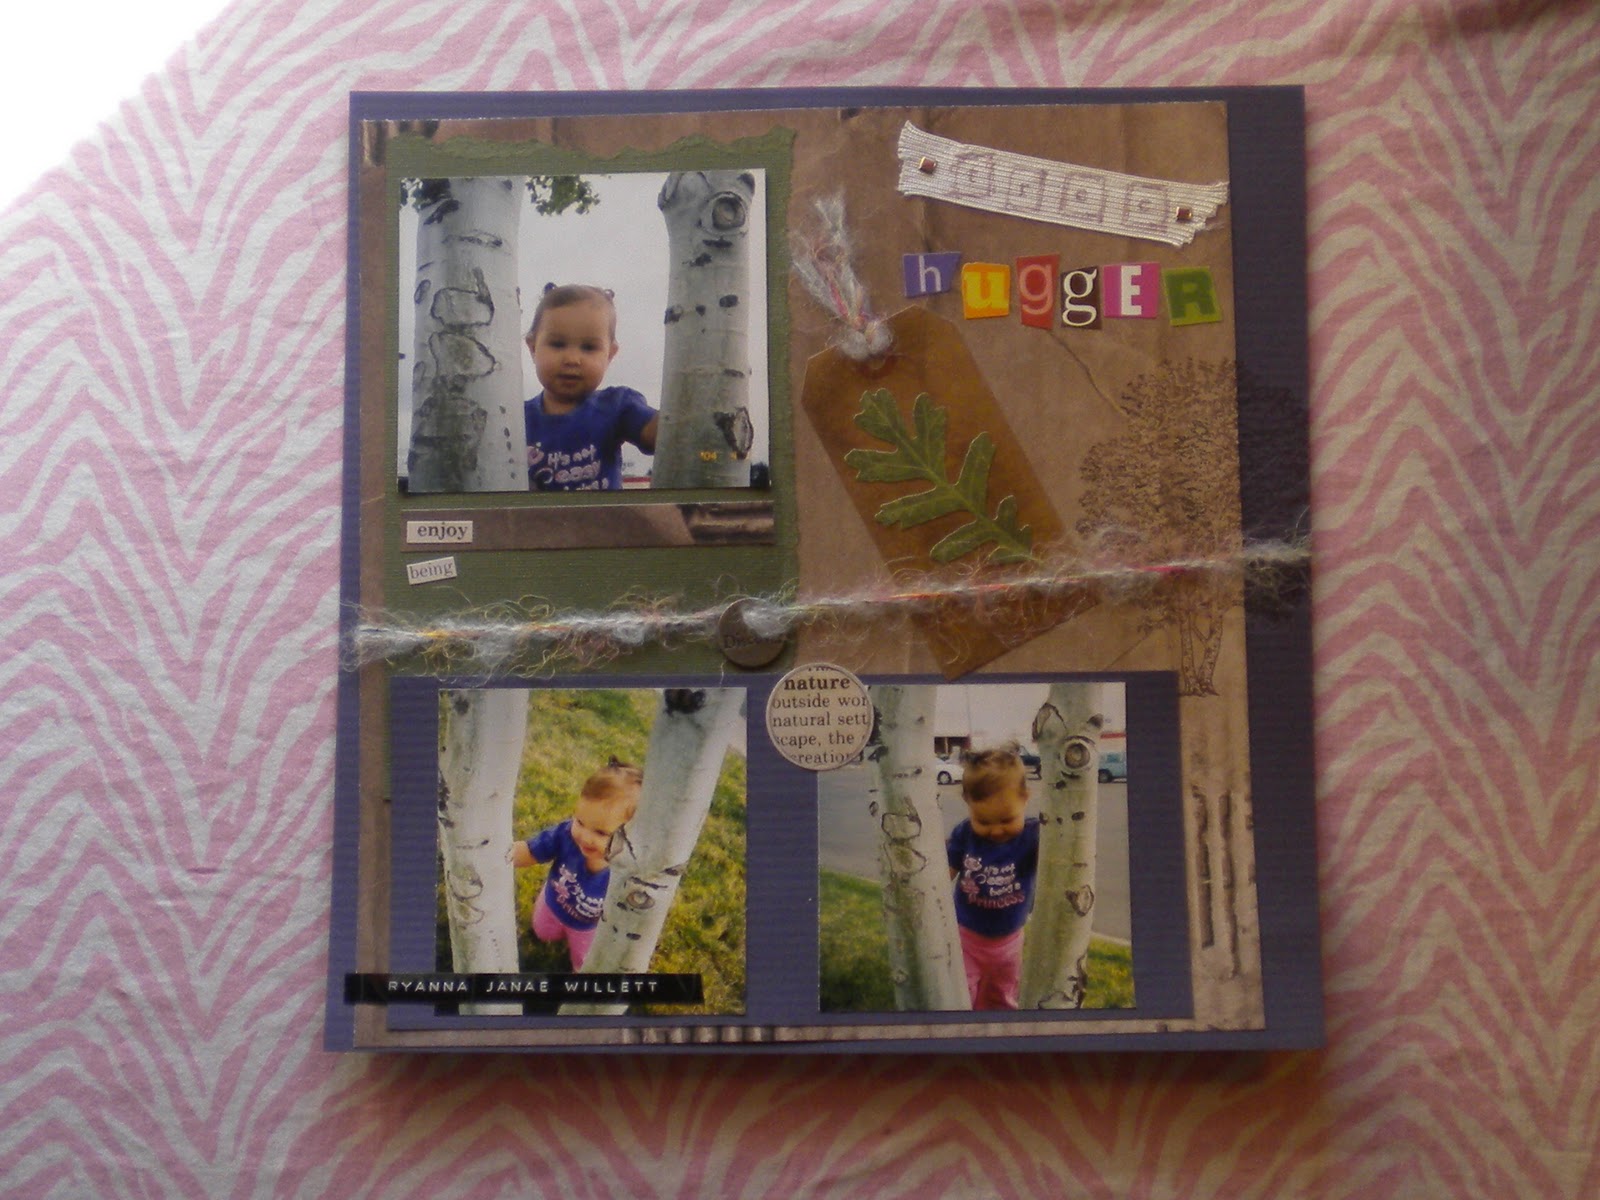
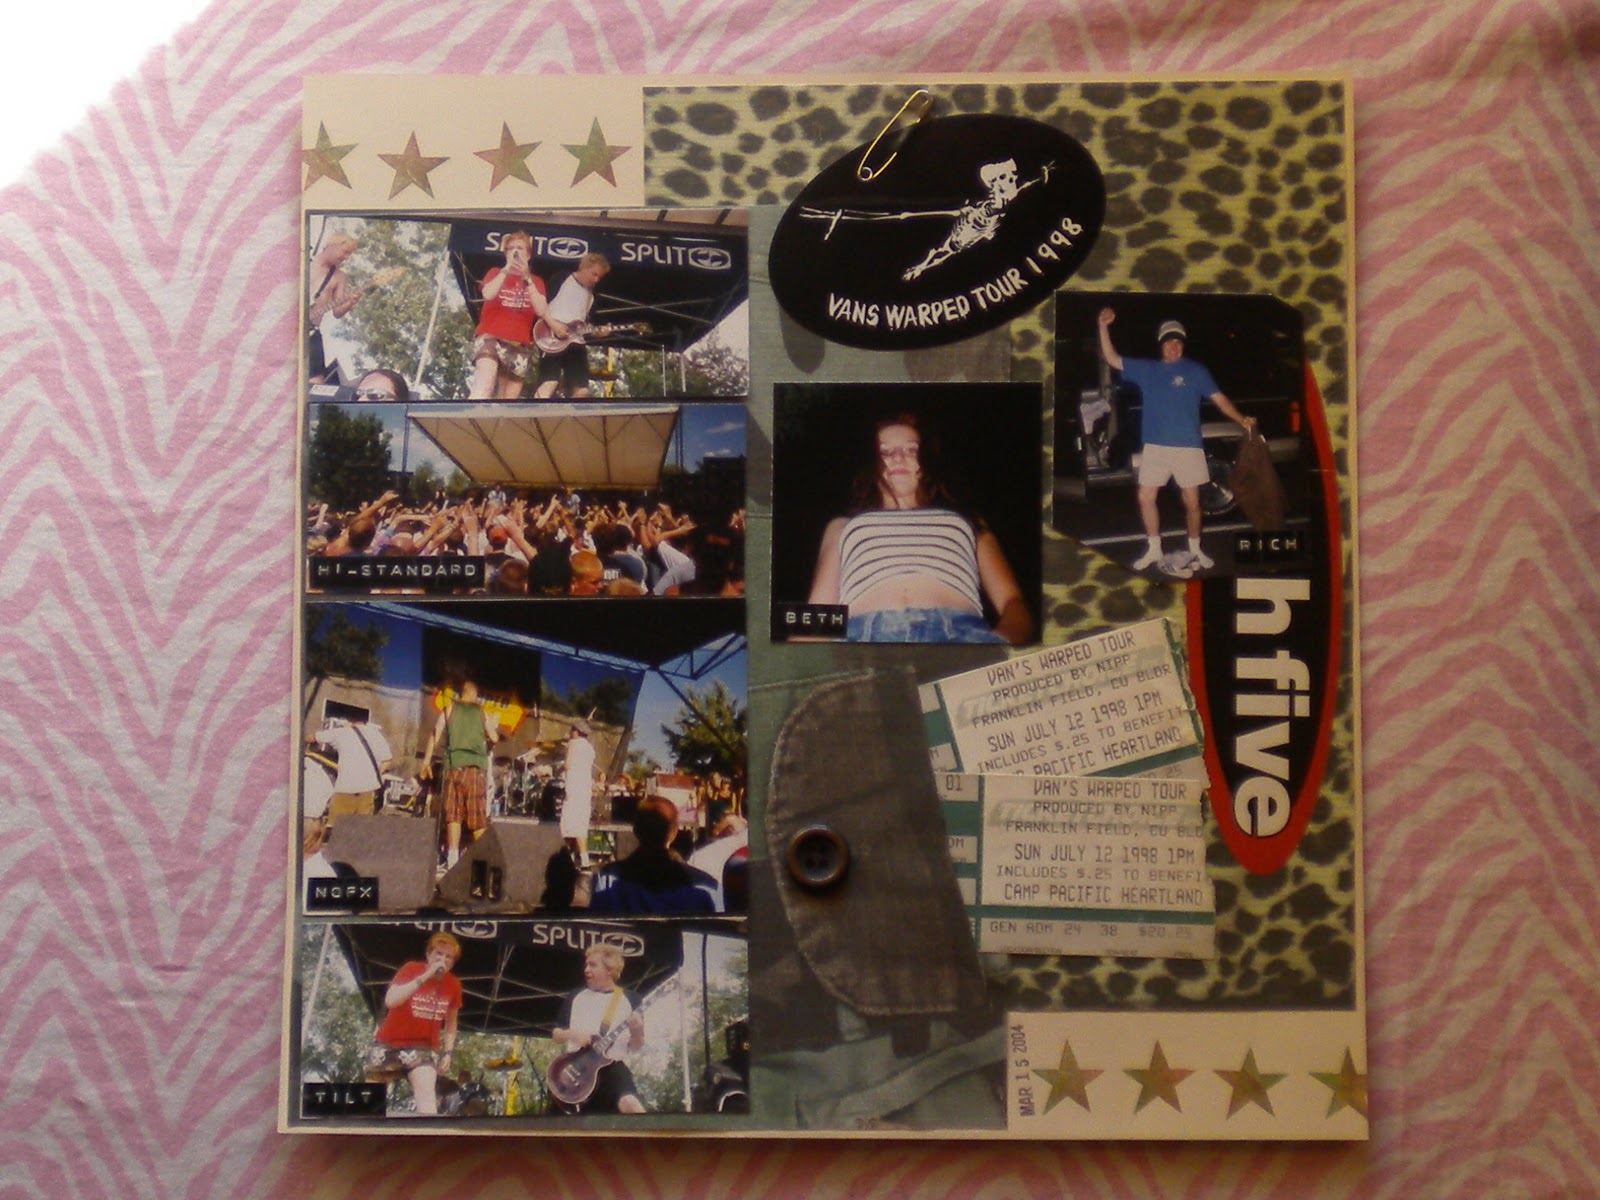
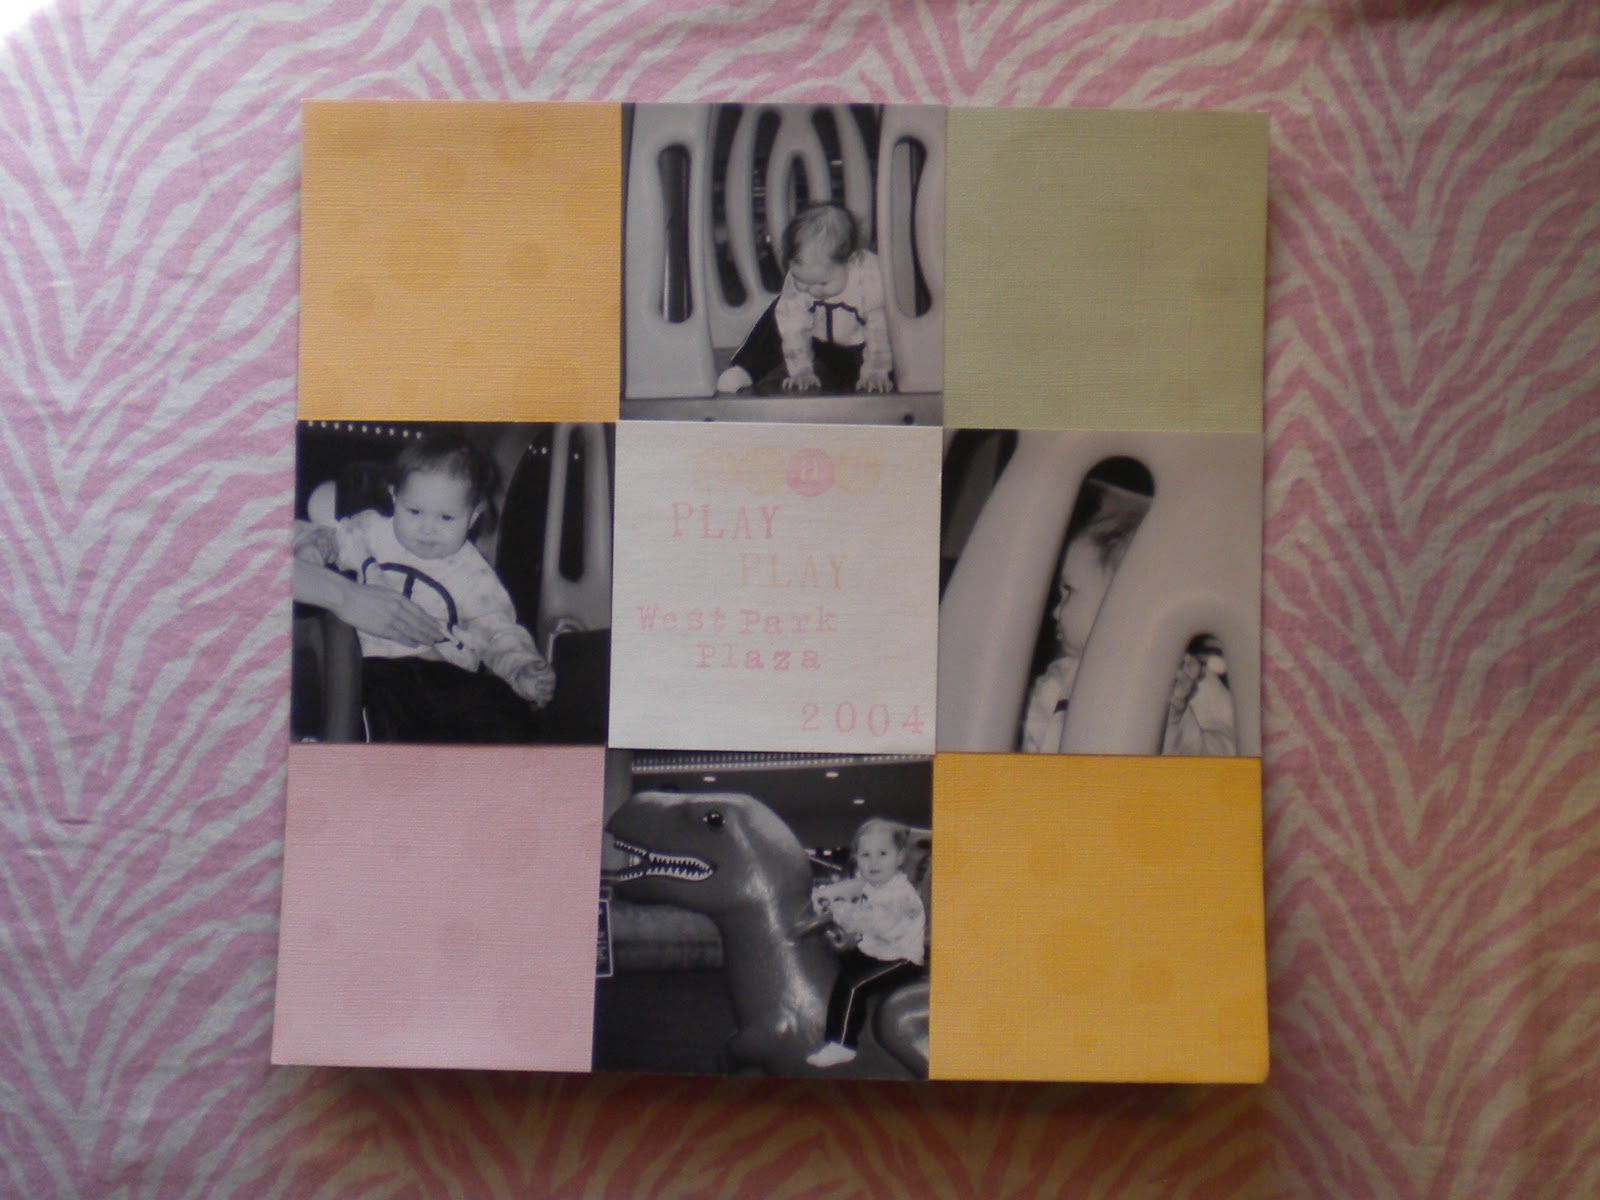
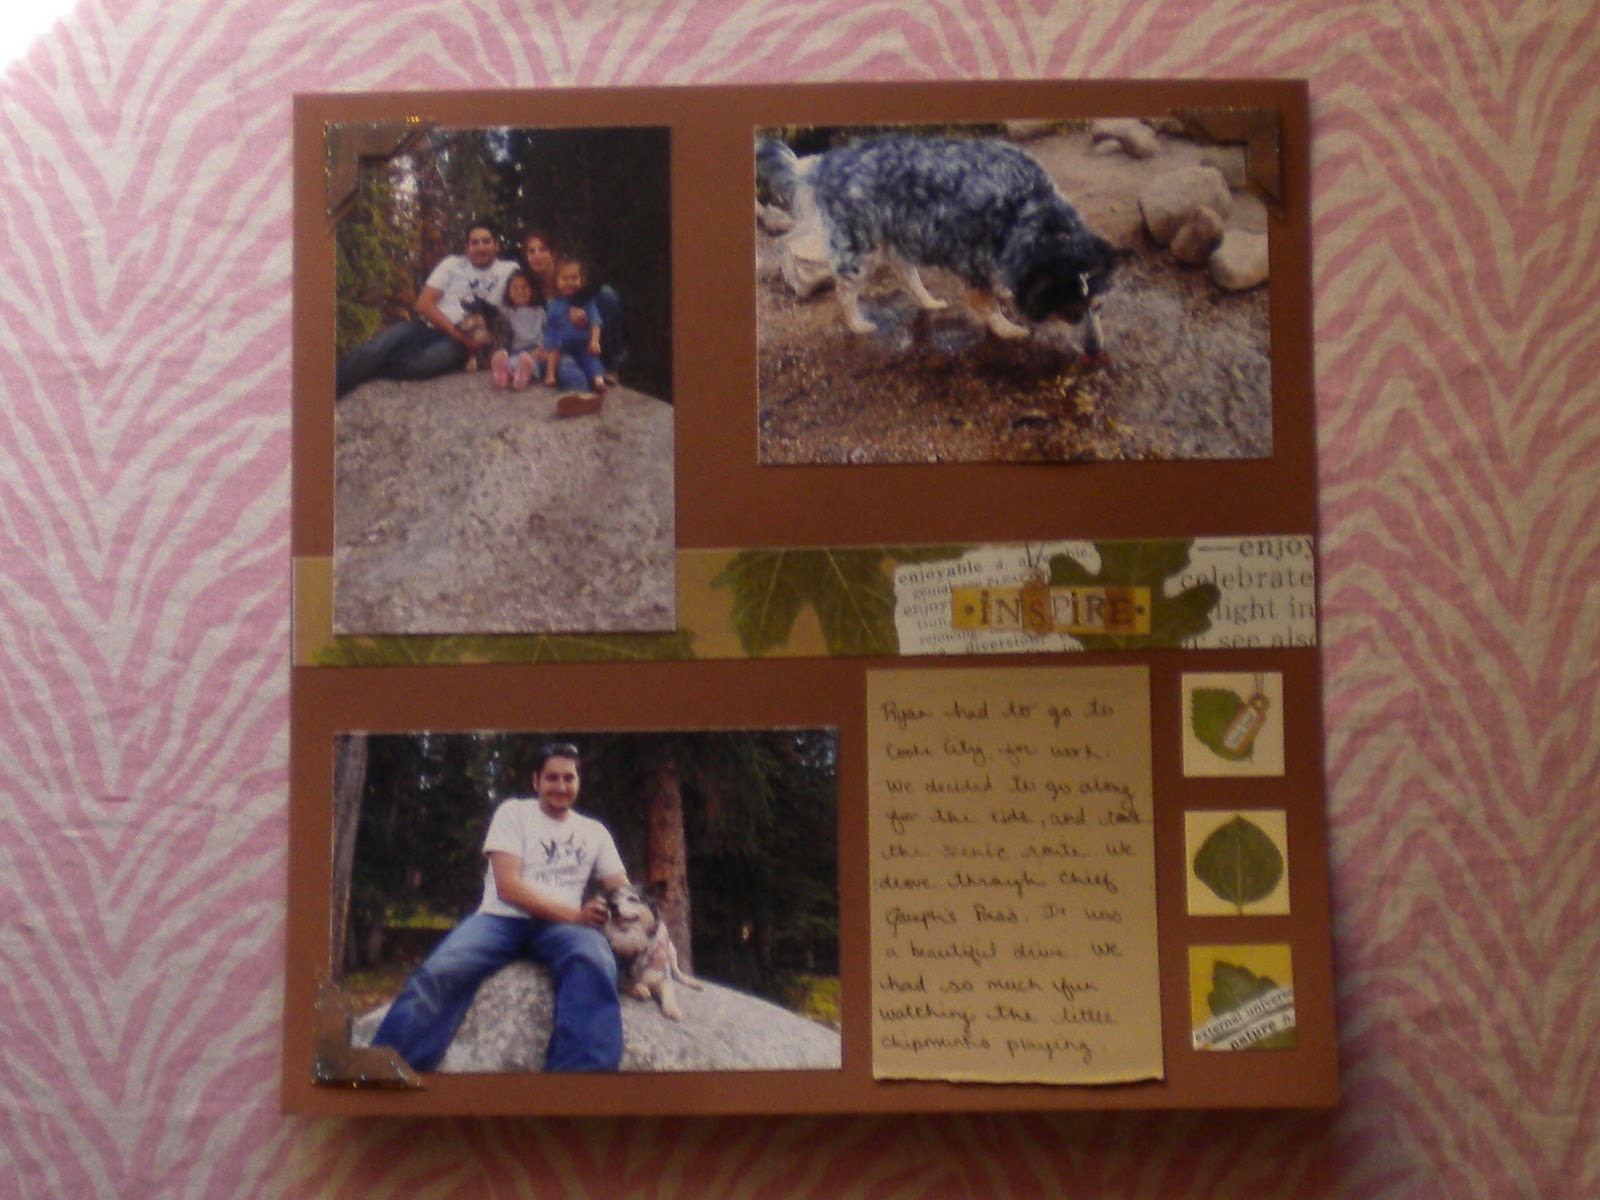
| Yes, you read it right, I'm an addict. I can't stop. I just keep clicking away, wanting to get that perfect shot. The problem is, I usually get lots of them. Maybe not perfect, but so loved by me. Scrapbooks have really evolved over the years. They used to be mostly a bunch of pictures in rows in a book, with a name or date scribbled next to it, sometimes. But open any scrapping magazine today, and they are filled with beautiful works of art. Pages that take hours, days, or even weeks to finish. Scraplifting is something we all like to do from time to time, but its so hard for me. Because of my addiction. You see, most of the pages being created today only have one picture per page. I. Just. Can't. How can I narrow down my lovely piles of photos to just one picture? I simply can't do it most of the time. So, in case you are a little like me, and love all your photos, here's a few pages to spur your creativity. Some of them have been scraplifted by me, but most are my own creations. Lots of these pages adorned the walls of my store, Paper Trails, so a few of you might recognize some of them. |
 |
| This is a page from a class I taught. It is super simple. Just cut a 12 inch long strip, any width. Pick a word or embellishment for the center. Cut down your strips to fit evenly on each side. Snip a corner off one side, flip it over, lay it on the other corner to make sure they match, and snip it off. Punch a few holes, and tie together with any fiber. The rest is pretty self-explanatory. Just message me if you ever need more detailed instructions. |
 |
| I loved the copper paper with the pink and turquoise. I'm always looking for different color combos, and I really like this one. |
 |

 |
| The frame for this picture is a technique we taught at our store. It is so fun, and uses up scraps. Lay a sheet of sticker paper sticky side up, place cut up scraps all over in any pattern. Sprinkle embossing powder over all the exposed sticker paper. Heat, as always, use caution. Heat guns get VERY hot! You will be amazed with your mosaic. |
Monday, February 14, 2011
Soap Petals
 |
| Here is a quick handmade gift for those who, like me, work well under pressure. I usually come up with a gift idea at the last minute. This is something I saw on the internet a while back, and I thought it was cute, but didn't give it another thought until Saturday night. I was at Wal-Mart, along with a million other last minute Valentine's shoppers. I saw a box of loose silk rose petals for only $2.00. I already had a bag of melt and pour glycerin soap at my house, as soap making is a hobby I've been dabbling in. It cost $6.99 at Hobby Lobby, but I used the 40% off coupon they frequently have. I also had some liquid dye and rose scent left from another project. You don't need the dye, but you could use it if you want different shades of petals. |
 |
| To make the soap petals, in a double-boiler, melt soap. I used a sauce pan, filled with water, and set a metal mixing bowl into the boiling water. I have read that once you use something to make soap, you should not use it for food prep. I'm not sure how dangerous this would actually be if you are using the melt and pour soap. Almost all hand soap contains lye, which is very dangerous all on its own, but the small amount that is in a finished bar of soap is hopefully not toxic in tiny traces. It seems all of us who wash our hands before eating might be dead by now if that were the case. ??? But, just to be safe, set aside some dishes just for making soap. After you have melted the soap, leave it on the stove on very low simmer while you dip the petals. Add some fragrance if desired. I used rose for rose petals, it only made sense. Stir the soap gently, as you don't want to make bubbles, they will show in your finished product. To dip the petals, pick up one at a time up with tweezers, then set it into the wax. Lift it back out, and set on wax paper to cool. You just want a thin layer of soap. Gently turn petals over once or twice while they are cooling to avoid clumps of puddled soap. When they are cool, they are done. They look beautiful setting in a soap dish, and are great for company, as they are single use, disposable soap. Each guest can use their own soap petal. These would be great for weddings, pretty and practical. I gave them to my daughters' teachers for Valentine's Day. I figured they might have their share of candy already. The petals would be great at school, too! A little bit of luxury for the women who are so important in my childrens' lives. These would also be romantic floating in a bath, adding beauty and fragrance. |
 |
| This is what I chose to package them in. Well, this is my second choice. I had little organdy bags, and I thought I could shoot them with a burst of steam from my iron, but it sucked the bag onto the iron and melted it instantly. I knew better! So I used sandwich bags. Cellophane bags would be much prettier, but as I said before, this was last minute. So I used what I had. I put red paper in my paper shredder to make a 'bed' for the petals. I put the paper shreds into the baggie, lay the petals on top, and tied it shut with a cute ribbon. I stamped a piece of the same red paper with 'Happy Valentine's', and wrote on the back of the tag explaining what the petals were for. |
Sweet Jazzy and Stinky Baby Boomer
 |
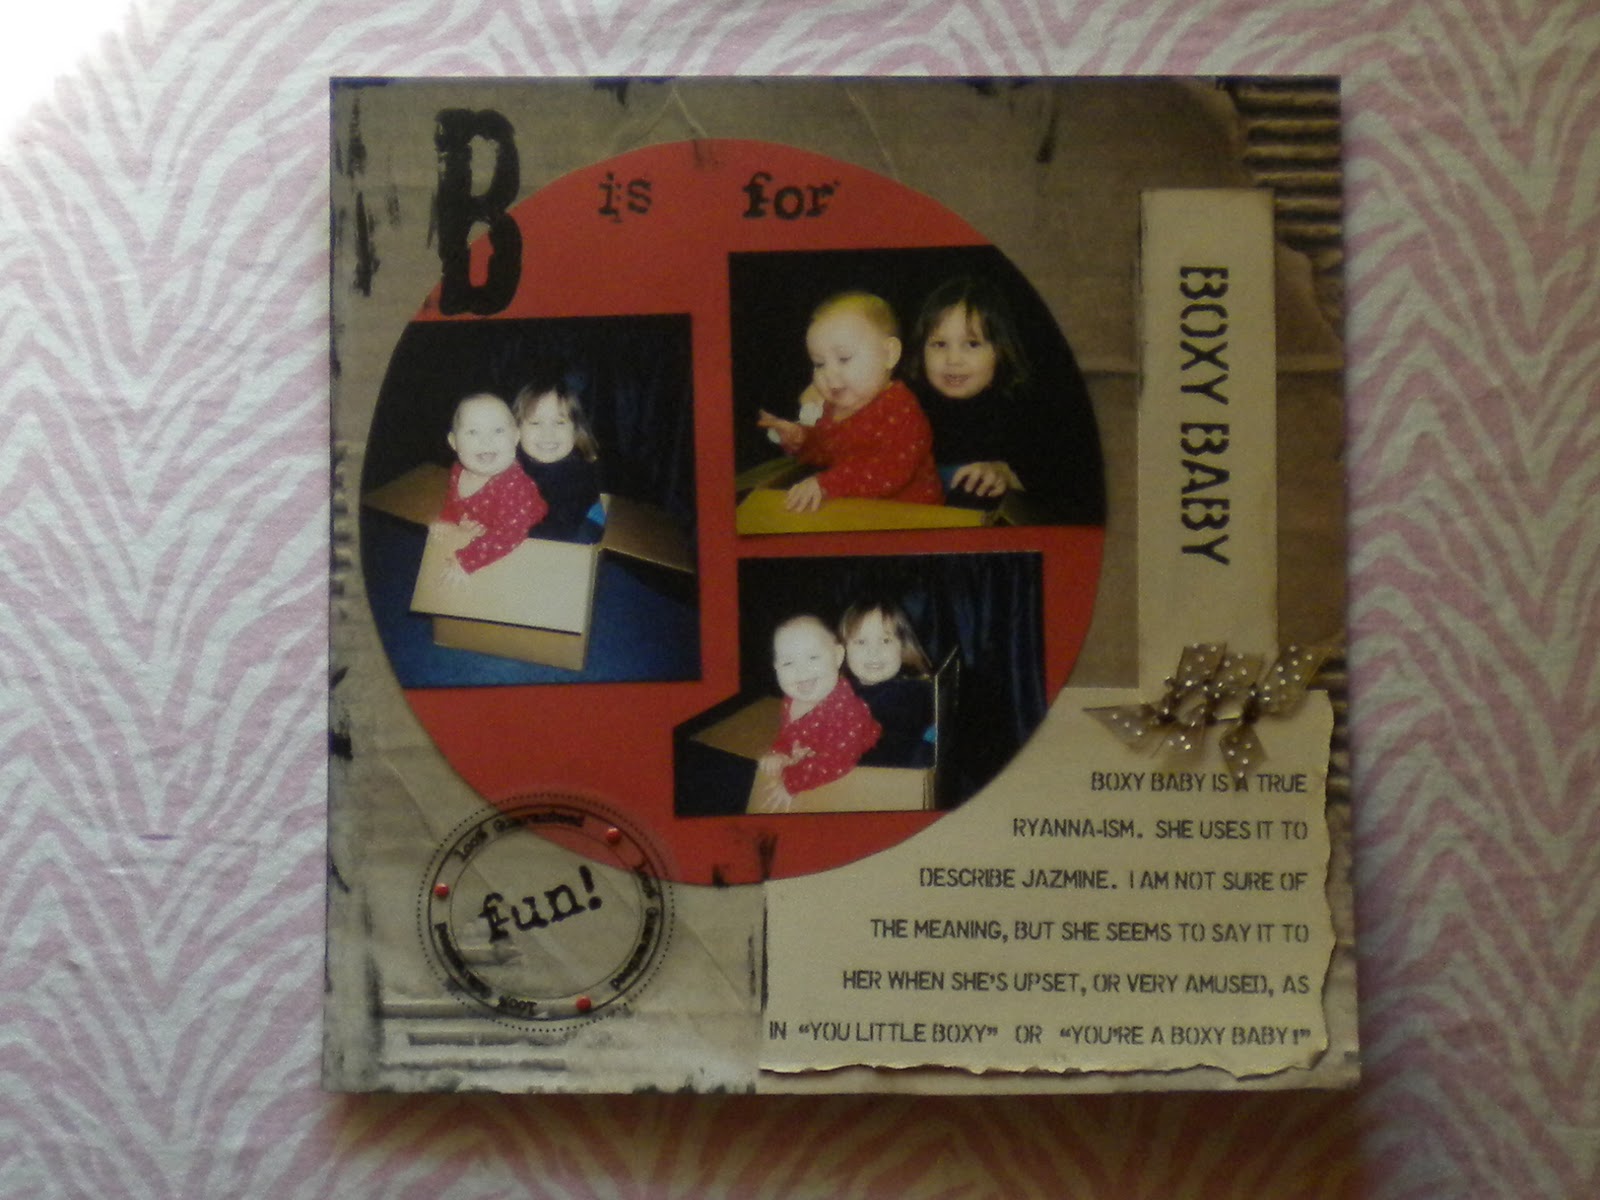
| This page came together very easily thanks to the beautiful paper. Jazzy is holding tiny baby Boomer. He is now an enormous moose of a dog, a boxer to be exact. He is so tall that he can look her right in the eye. |
 |
| I cut this out of another sheet, and for added dimension, adhered it with foam tape. It it layed over a vintage ribbon, which is attached with brads. |
 |
| More dimension here with the flowers and butterfly. I used oodles of paper flowers, layered a small flower over a larger one, and attached them with pink brads. The butterfly is actually two. I cut these from a patterned paper, gluing one down flat, and the second one pops by just gluing the body and bending wings up to flutter. |
Tuesday, February 8, 2011
Zentangle
  |
| This is a Zentangle, with my spin, of course. Zentangle is supposed to be this 'new' art form. But I think not. I have a feeling I'm not the only one who has been doing this since I was in grade school. But I guess it is being newly appreciated as a form of art. It is wonderfully zen. Just start drawing, doodle to your heart's content. My mom inspired this project when I saw her Zentangle. The top Zentangle pictured is hers. I loved it so much that I started my own as soon as I got home. This butterfly is made from my hands and my daughter's hands. Most of the Zentangles I saw were black and white, but I had to use my rad new Sharpies for something. They are a special edition, 80's! They have colors like legwarmer orange, banana clip yellow, and jelly pink. |
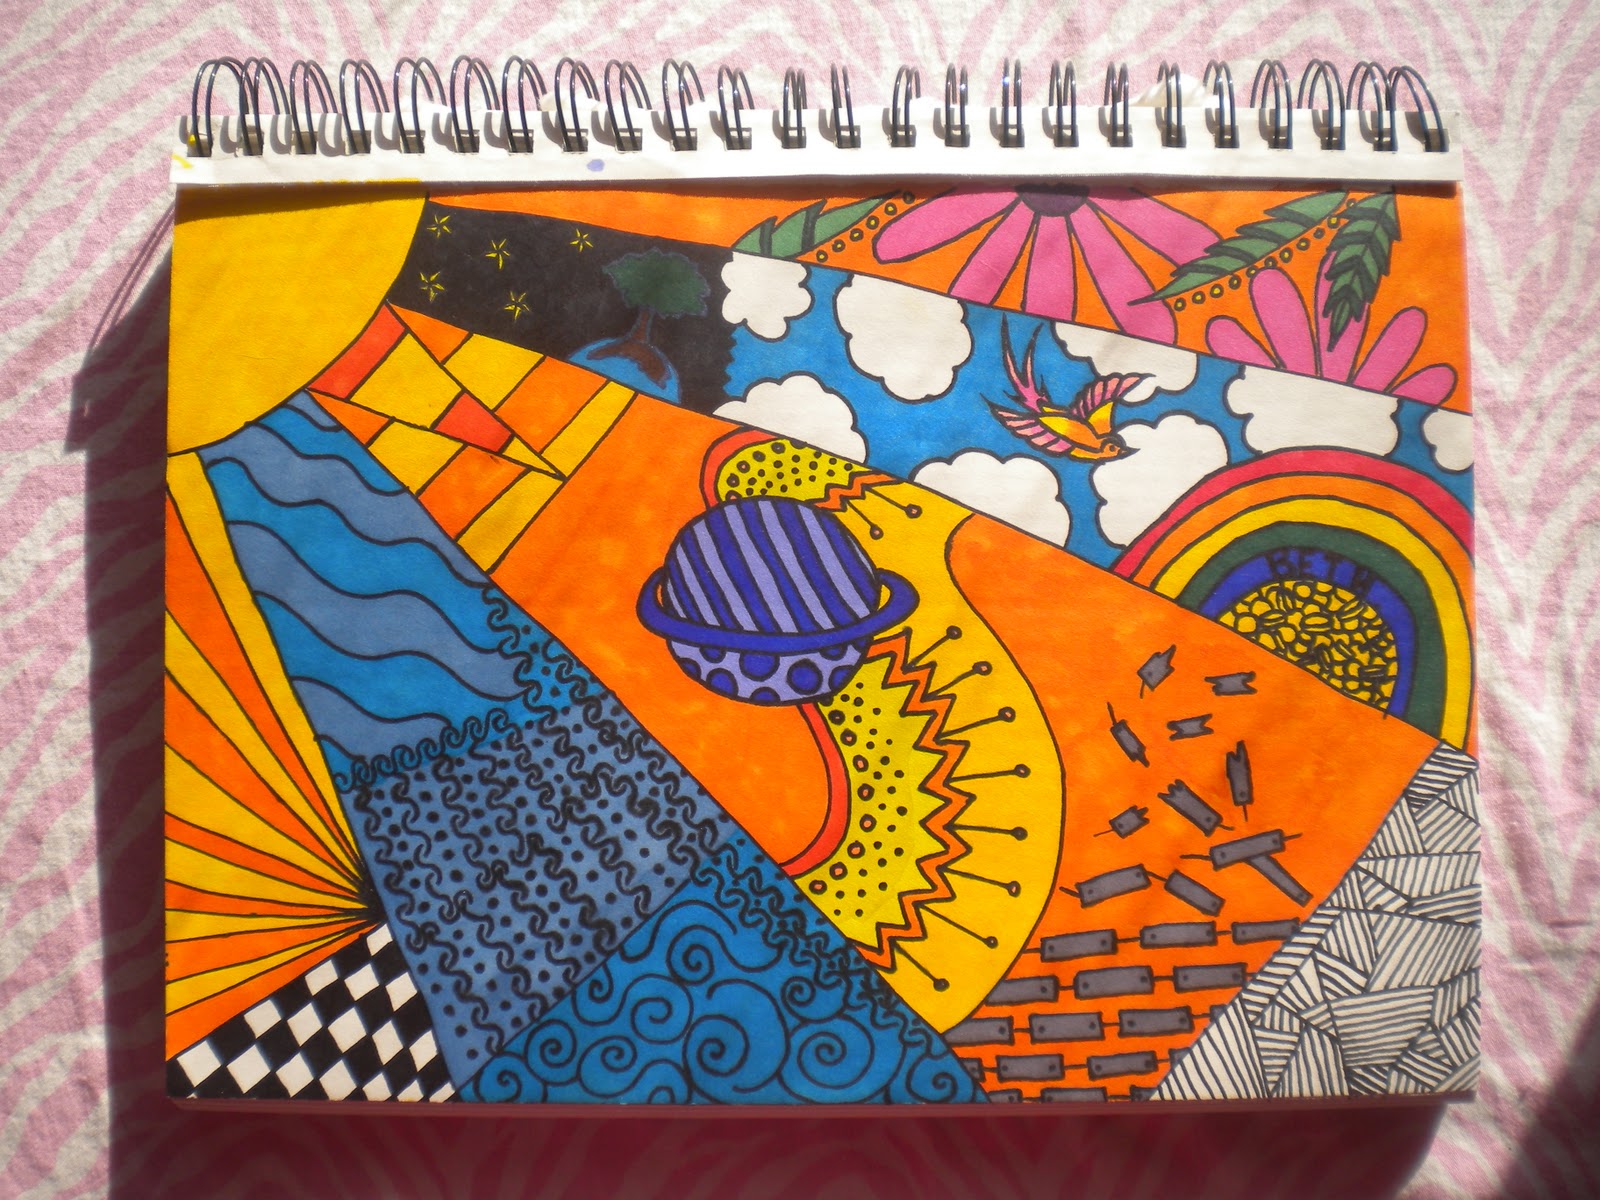 |
| Here is my second one. I highly recommend using a permanent marker so you can't erase. There are no mistakes in Zentangle! Just free-flowing creativity. Have fun and send me your masterpiece. We would all love to see it! |
Tuesday, January 25, 2011
My Craft Room Before
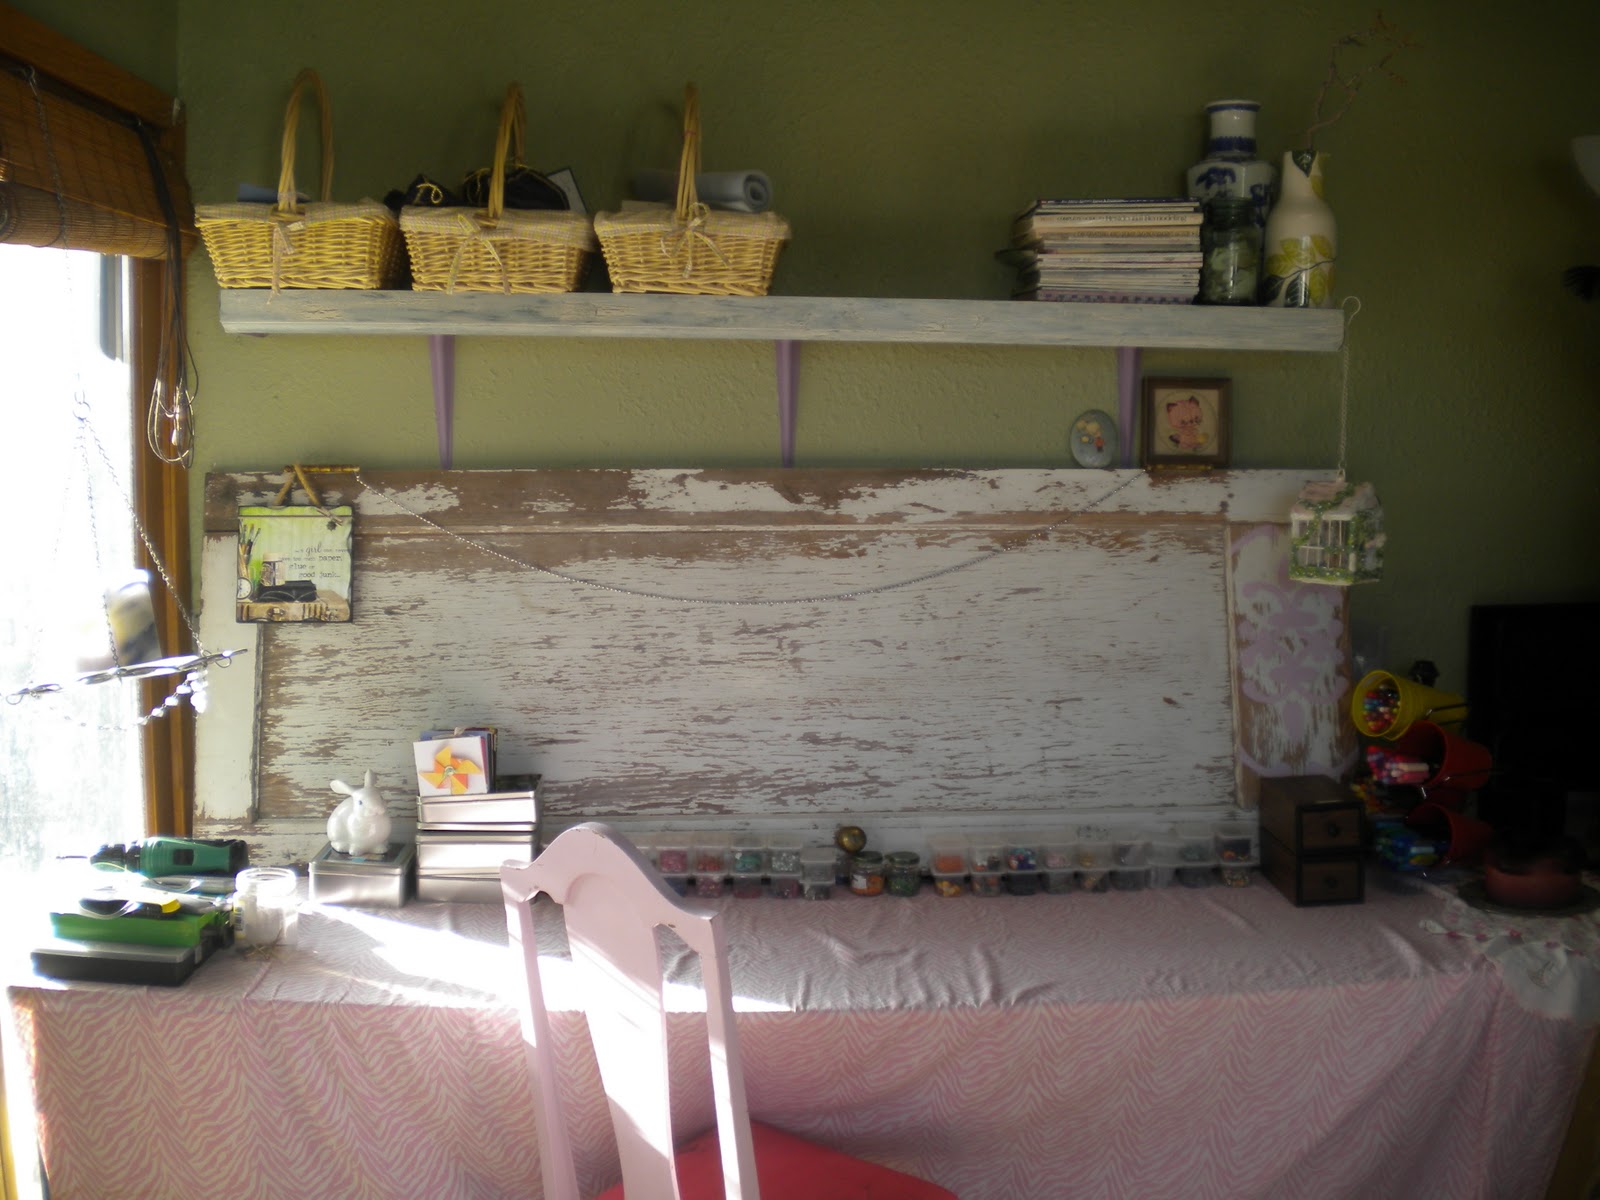 |
| This is the -before- picture of my craft room. I am not changing it because I dislike it, but because the roof sprung a leak from our tornado. It was only dripping, but now that it snowed, its more like a waterfall! The chair was $3 at a yard sale, and I painted and reupholstered it. The door across the back is an original door from my house, which was built in 1937. I loved it too much to throw it away when we remodeled. It is skinnier than a modern door, and the door knob is so tiny and cute. I leaned it against the garage outside for a while, and for once,being a procrastinator payed off this time! Perfectly shabby chic, with no effort at all. (Besides convincing my hubby not to throw it out!) |
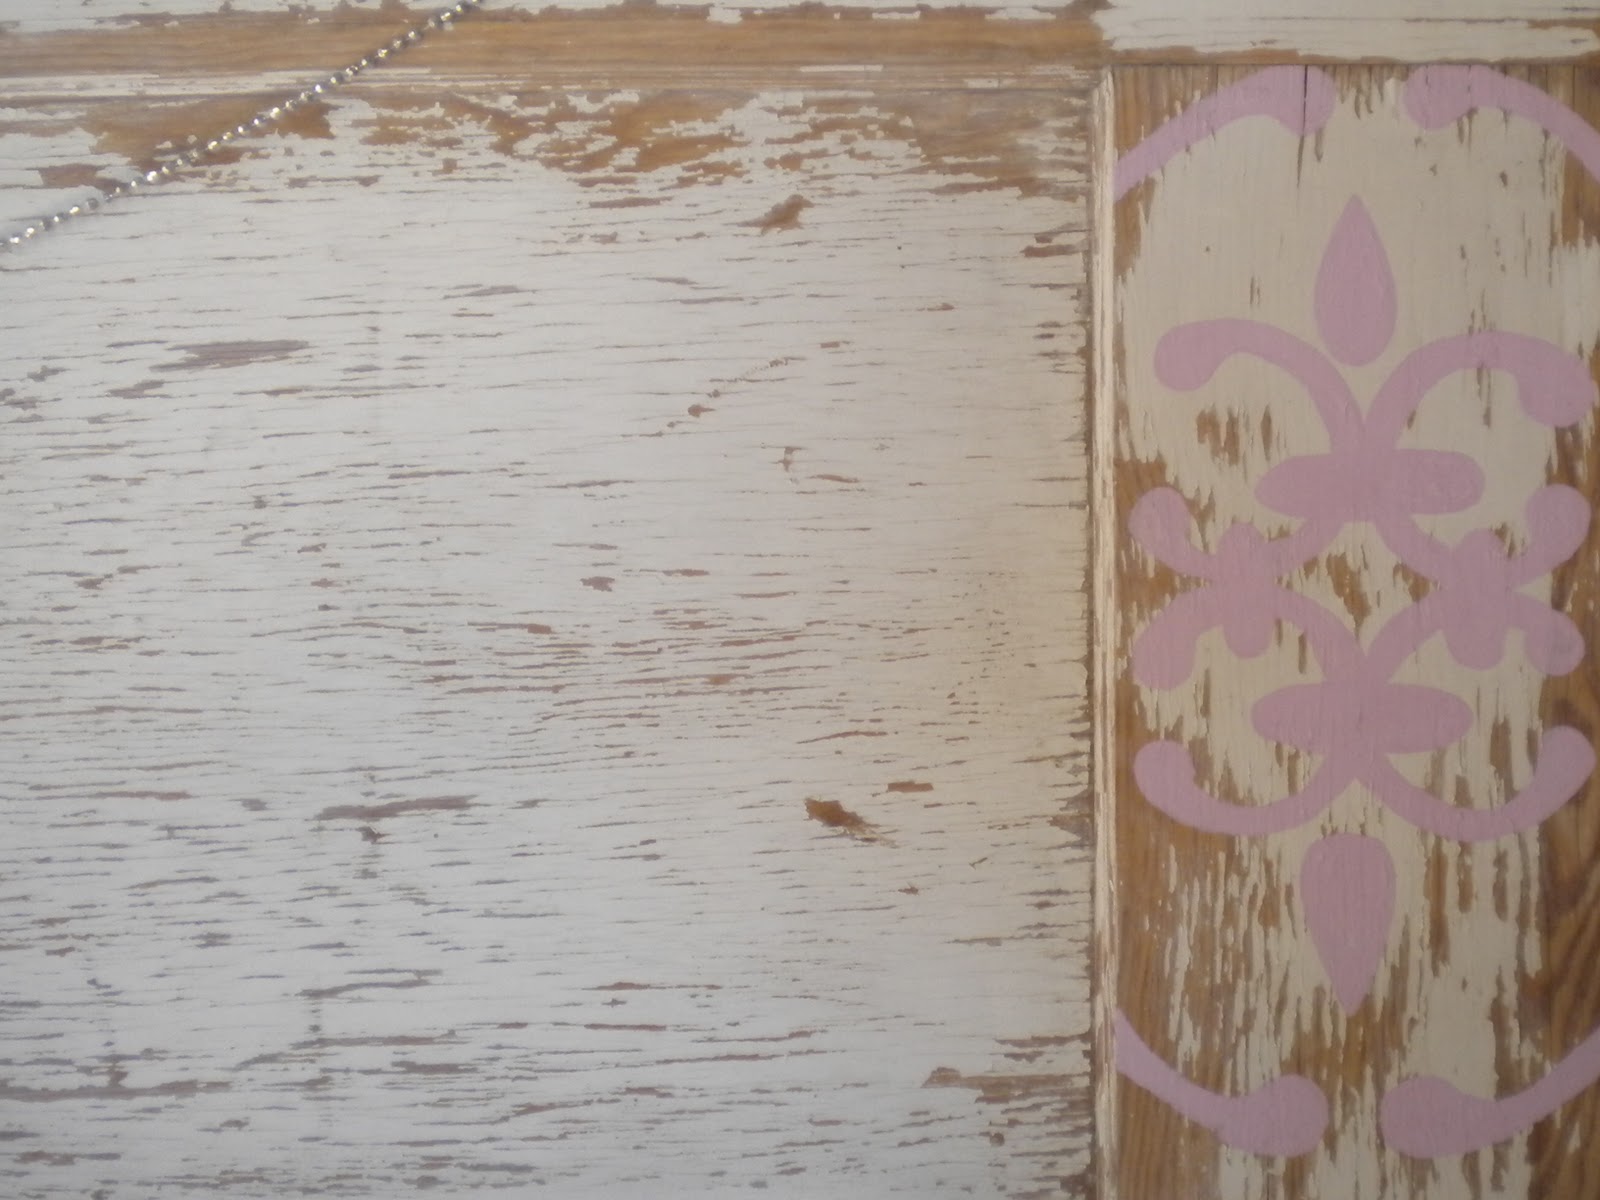 |
| I lightly sanded it to get the loose paint chips off. Then I spray painted the whole thing with a clear coat to seal it in. The design I painted is similar to the paper I chose to accent the room with. I used a paper plate and a lid to a cup to get the circles. I free handed the rest. |
 |
| I keep my beads in baby food containers, they stack nicely and its easy to see whats there. I'm always more creative when everything is spread out in front of me. |
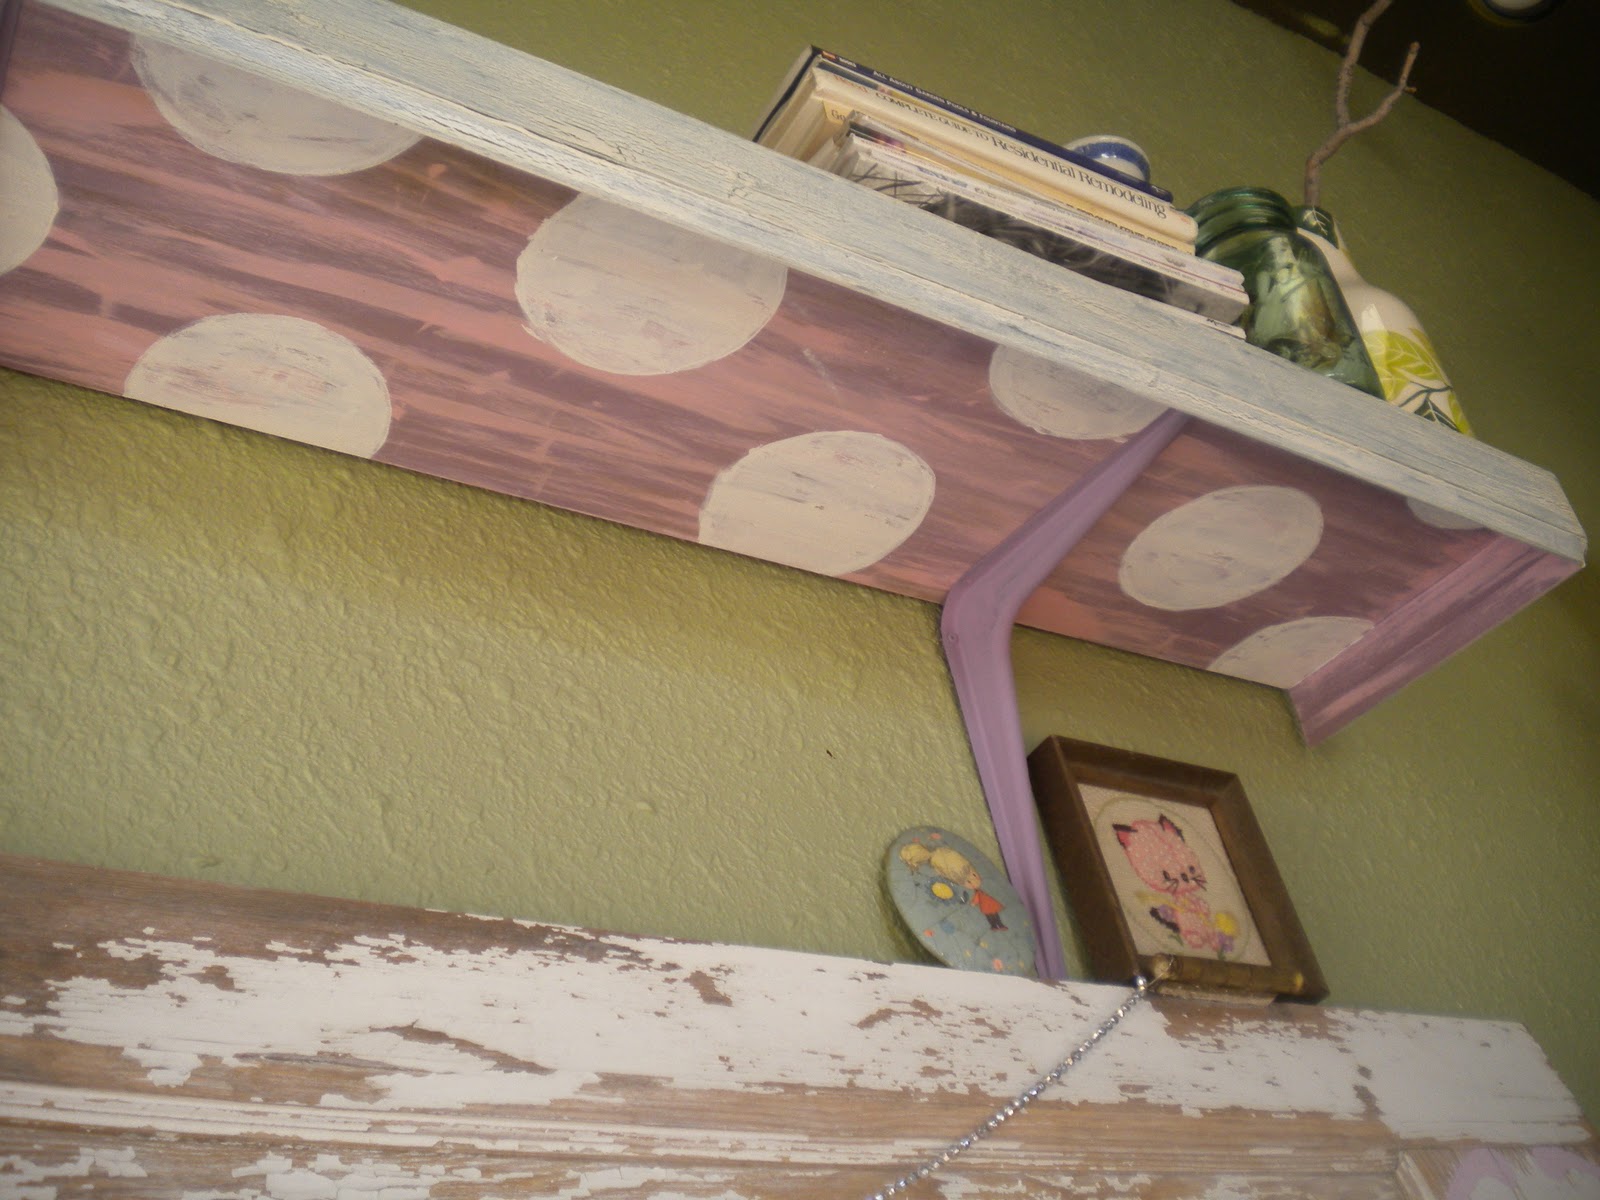 |
| This shelf was recycled from the old fireplace mantle. I painted it with acrylic paint, then a crackle coat, and then more paint. Its the first crackle project I've done, and it won't be the last! I loved the anticipation of not knowing exactly what it would look like, and peeking at the crackling in progress. |
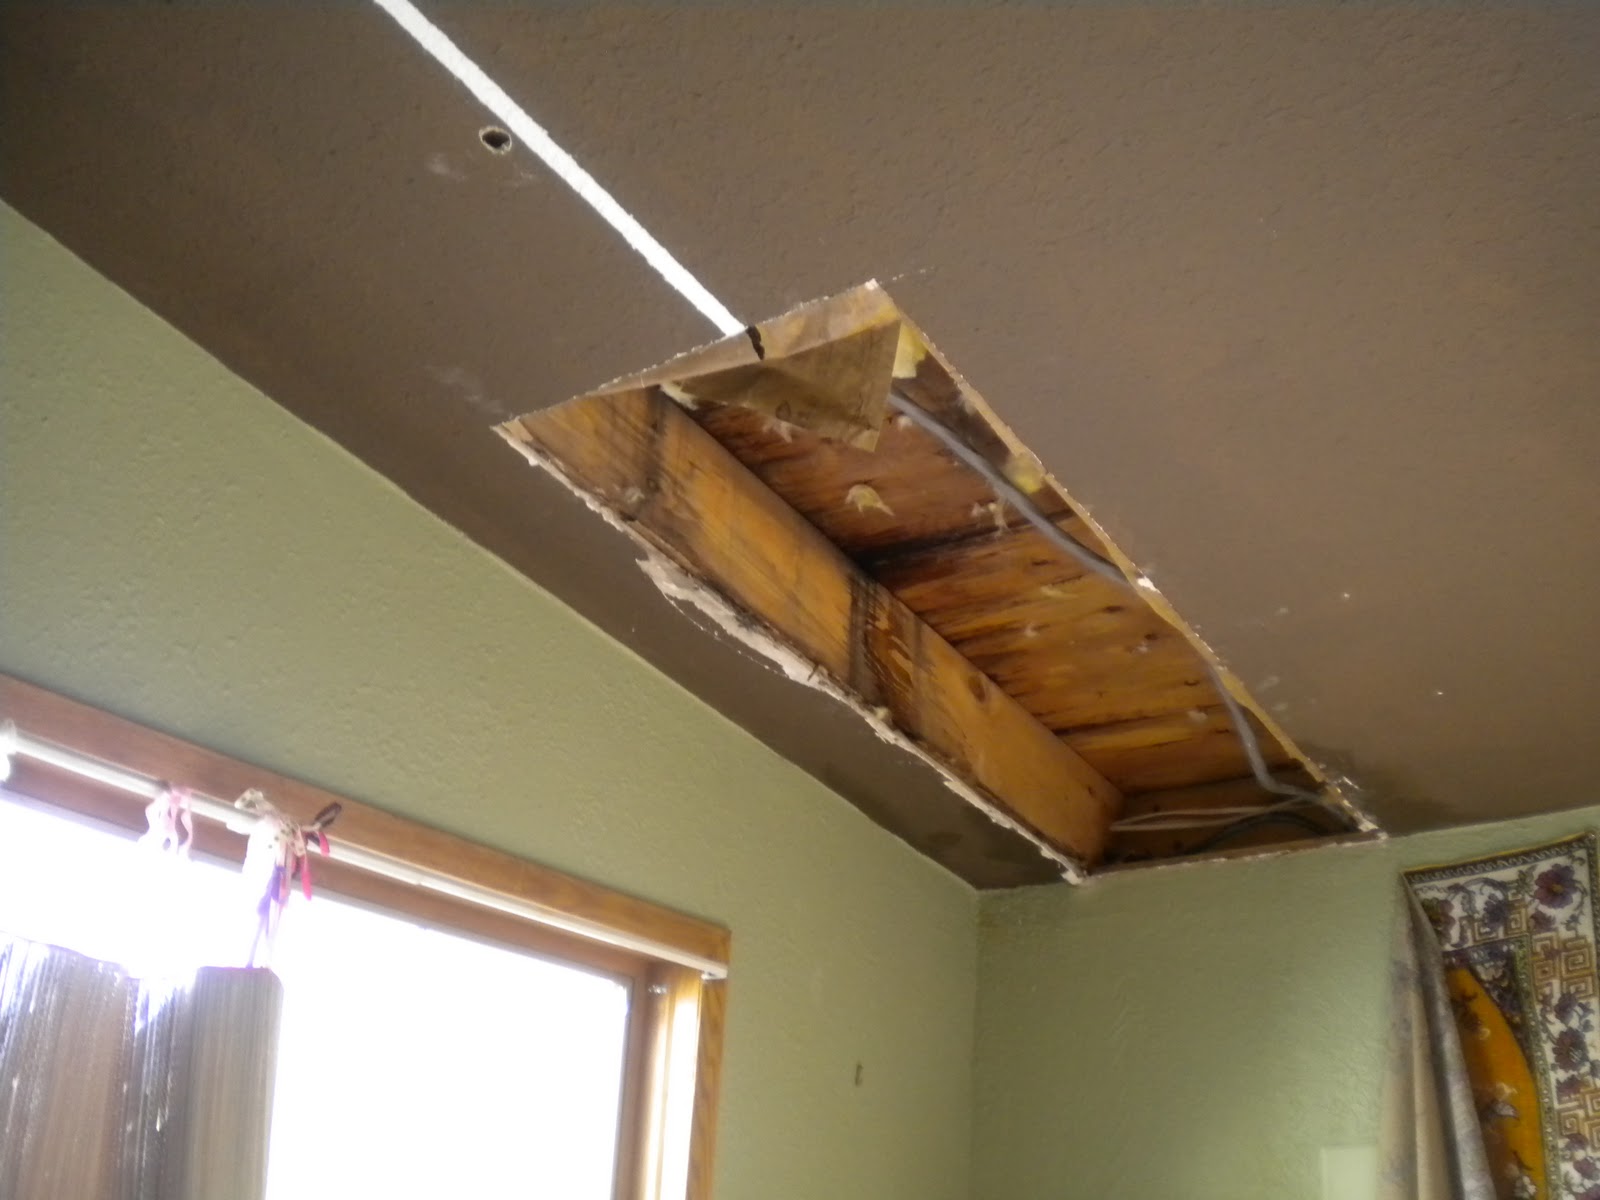 |
| Here is the sad part. Just one of the many leaky spots now in the ceiling. But, it is soon to be fixed, if the weather stays mild. So there will be a Craft Room -After- coming (hopefully) soon! |
Thursday, January 20, 2011
Condolance Card
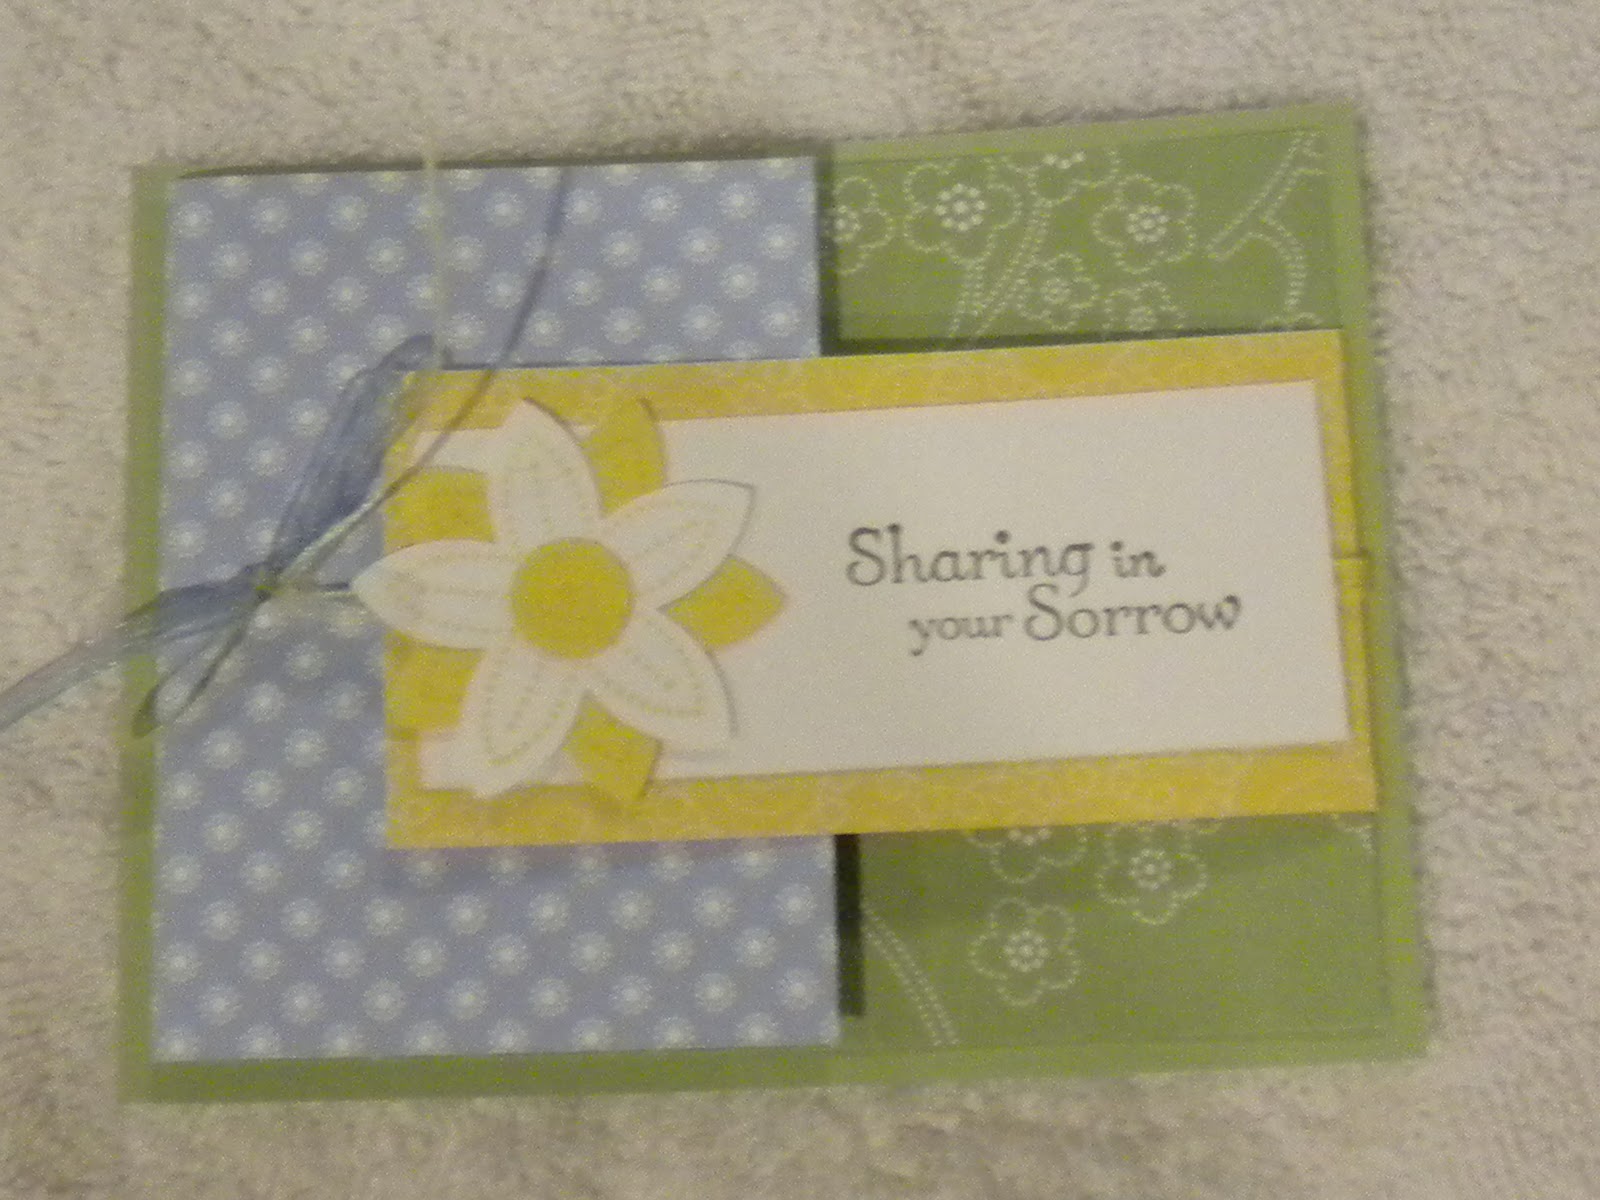 |
| This card design can be an impressive and quick card if you use coordinating paper. You could also dig out the scraps and really get creative, depends on your time frame. This card is made from Stampin' Up paper. 1- Start with you standard card size, 4 1/4 x 5 1/2 (green). This is just a sheet of card stock, not folded. 2-Then cut a piece (green w/ flowers) that is 4 x 5 1/4. 3-Next, cut one that is 4 x 3 3/4 ( blue w/ flowers). This size gives you room for a 1 inch flap, score and fold at 2 3/4. 4-The yellow strip is 4 3/4, score and fold on the 4 inch mark, giving you a 3/4 inch flap. 5- Now, cut the last piece that is 3 3/4 x 1 3/4, to stamp your sentiment on. I suggest stamping your sentiment on before assembling card. 6-Cut 2 lengths of ribbon to create the bow. You can use 2 different colors, as in the sample, or stick with 1 for a monochromatic look. While you are gluing the card together, remember to put the ribbon in place. So start by attaching the blue flap (3) to the green flower paper (2) on one side, and the yellow flap (4) on the other side. Then place one ribbon between the blue flower (3) and green card stock (1), and the other ribbon between the yellow (4) and green (1). Glue into place. Glue white paper (5) to yellow (4), running ribbon between them. Attach a 3-d element, like the flower in the sample. |
Monday, January 17, 2011
Valentine's Paper Crafts
 |
| I made this with a sheet of scrapbook paper and a few quotes I found and printed off the Internet. I tore the paper up, and modge podged it, along with the quotes, to a small paint can. The can is to put love notes in. Unfortunately, I haven't filled my can up yet, but its still fun to make. The small tin is an Altoid tin, and I used modge podge on this, too. I used some acrylic paint and a border sticker to decorate the edges of the tin. I used a corner punch to round the corners of my business cards, and store them in here. |
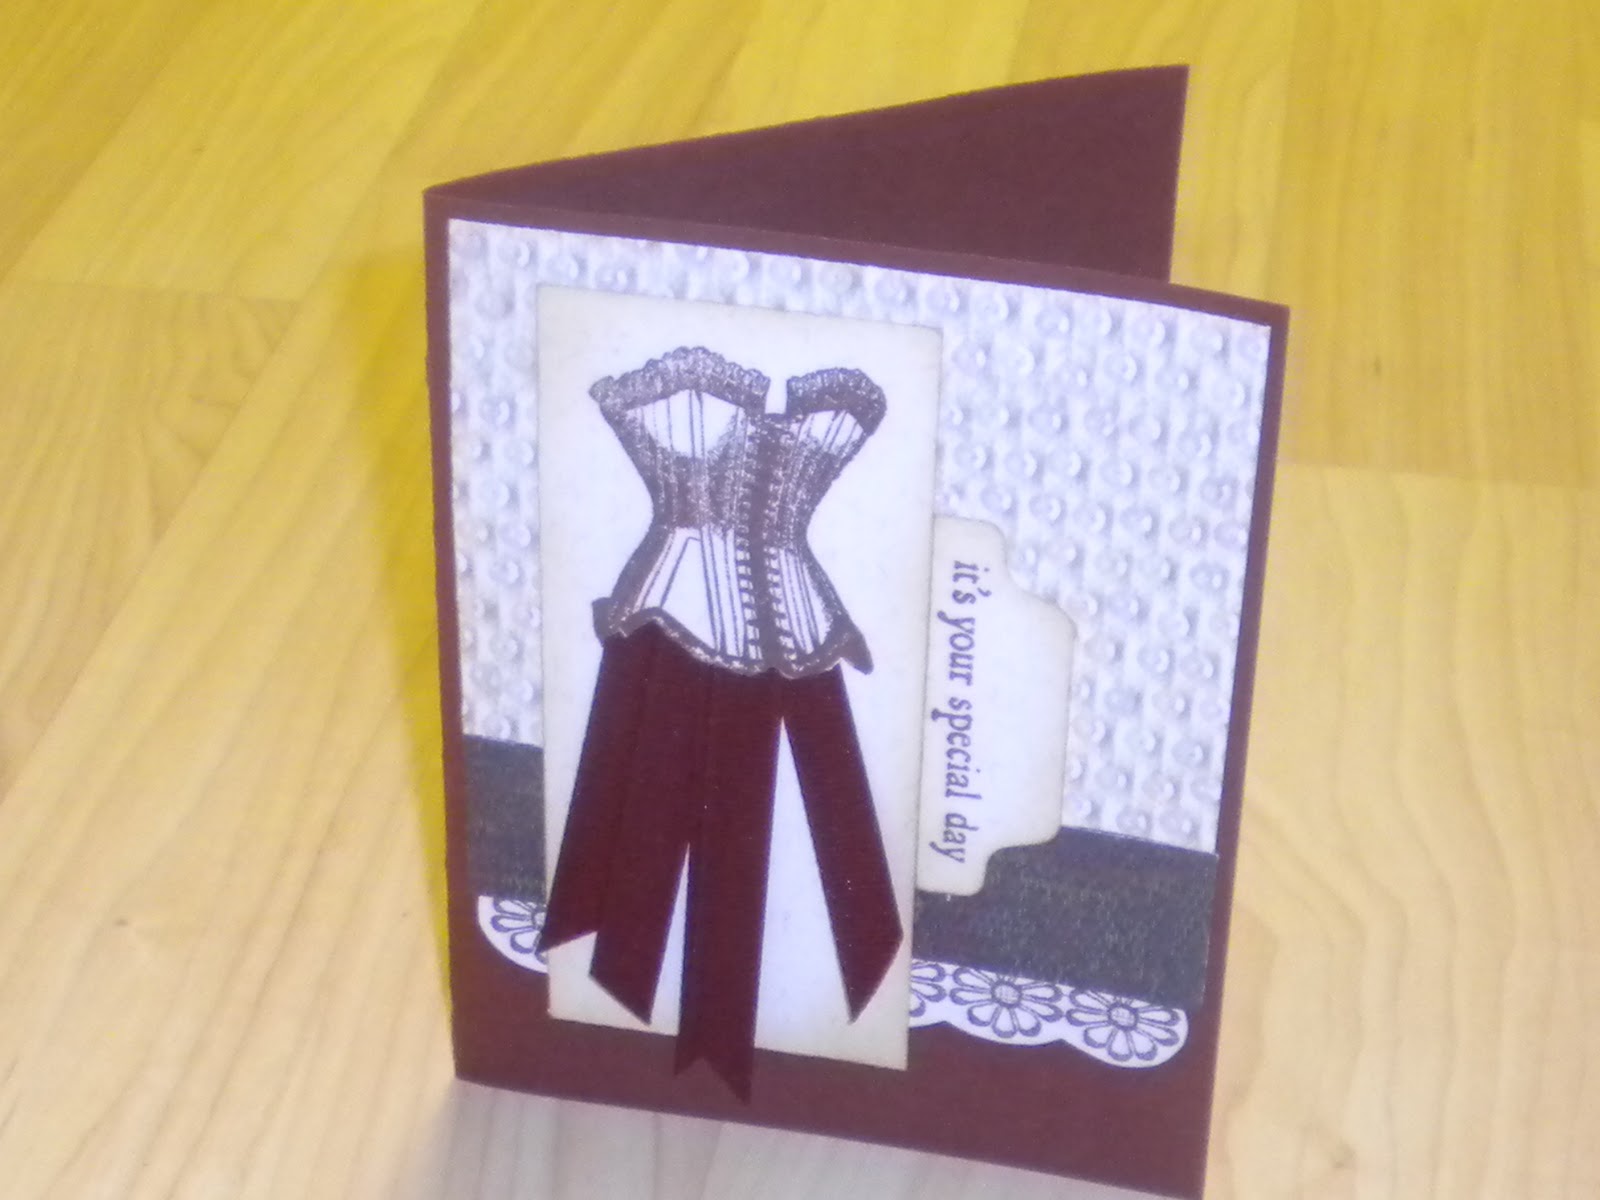 |
| This card has a fun 3-d element, and its a great way to use scraps of ribbon. I made one with all different colors of bright ribbons on a black background, too. Corsets seem very romantic to me, but I bet they didn't seem that way if you had to wear them every day! |
 |
| I made these at a make-n-take at my mom's house. The die cut is a Stampin Up die called Top Note. I got the black layer by cutting carefully around the scrap from a black die cut. |
 |
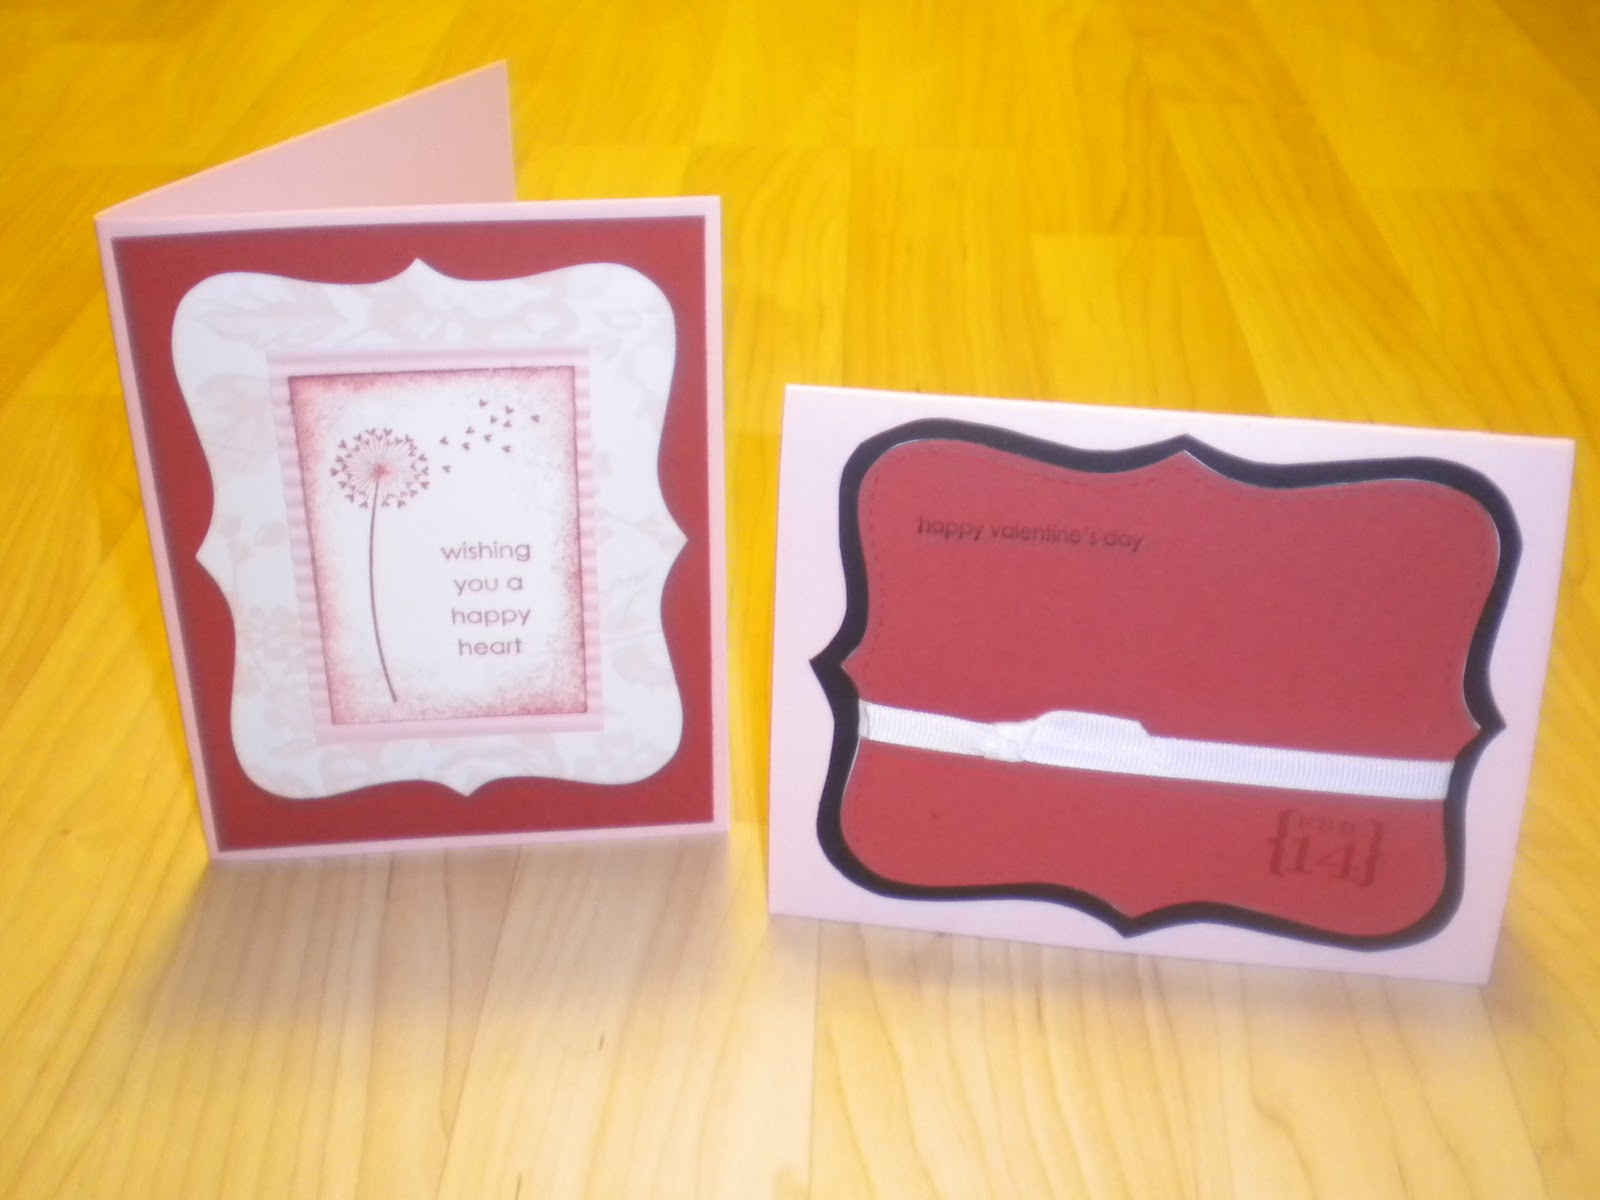
| This is a quick and easy card, great for a girlfriend's V-day card. I love this set, Fabulous Flowers, a retired Stampin Up set. You can use any big flower stamp with more than one row of petals. Make the flower pop! Stamp it a few times, and cut out layers. Layer them, glue them directly to each other, or for more depth, layer them with adhesive foam tape. I added some sparkle by putting a dot of stickles (glitter glue) on the tip of each petal. You can add even more to it by curling the edges of the petals slightly. |
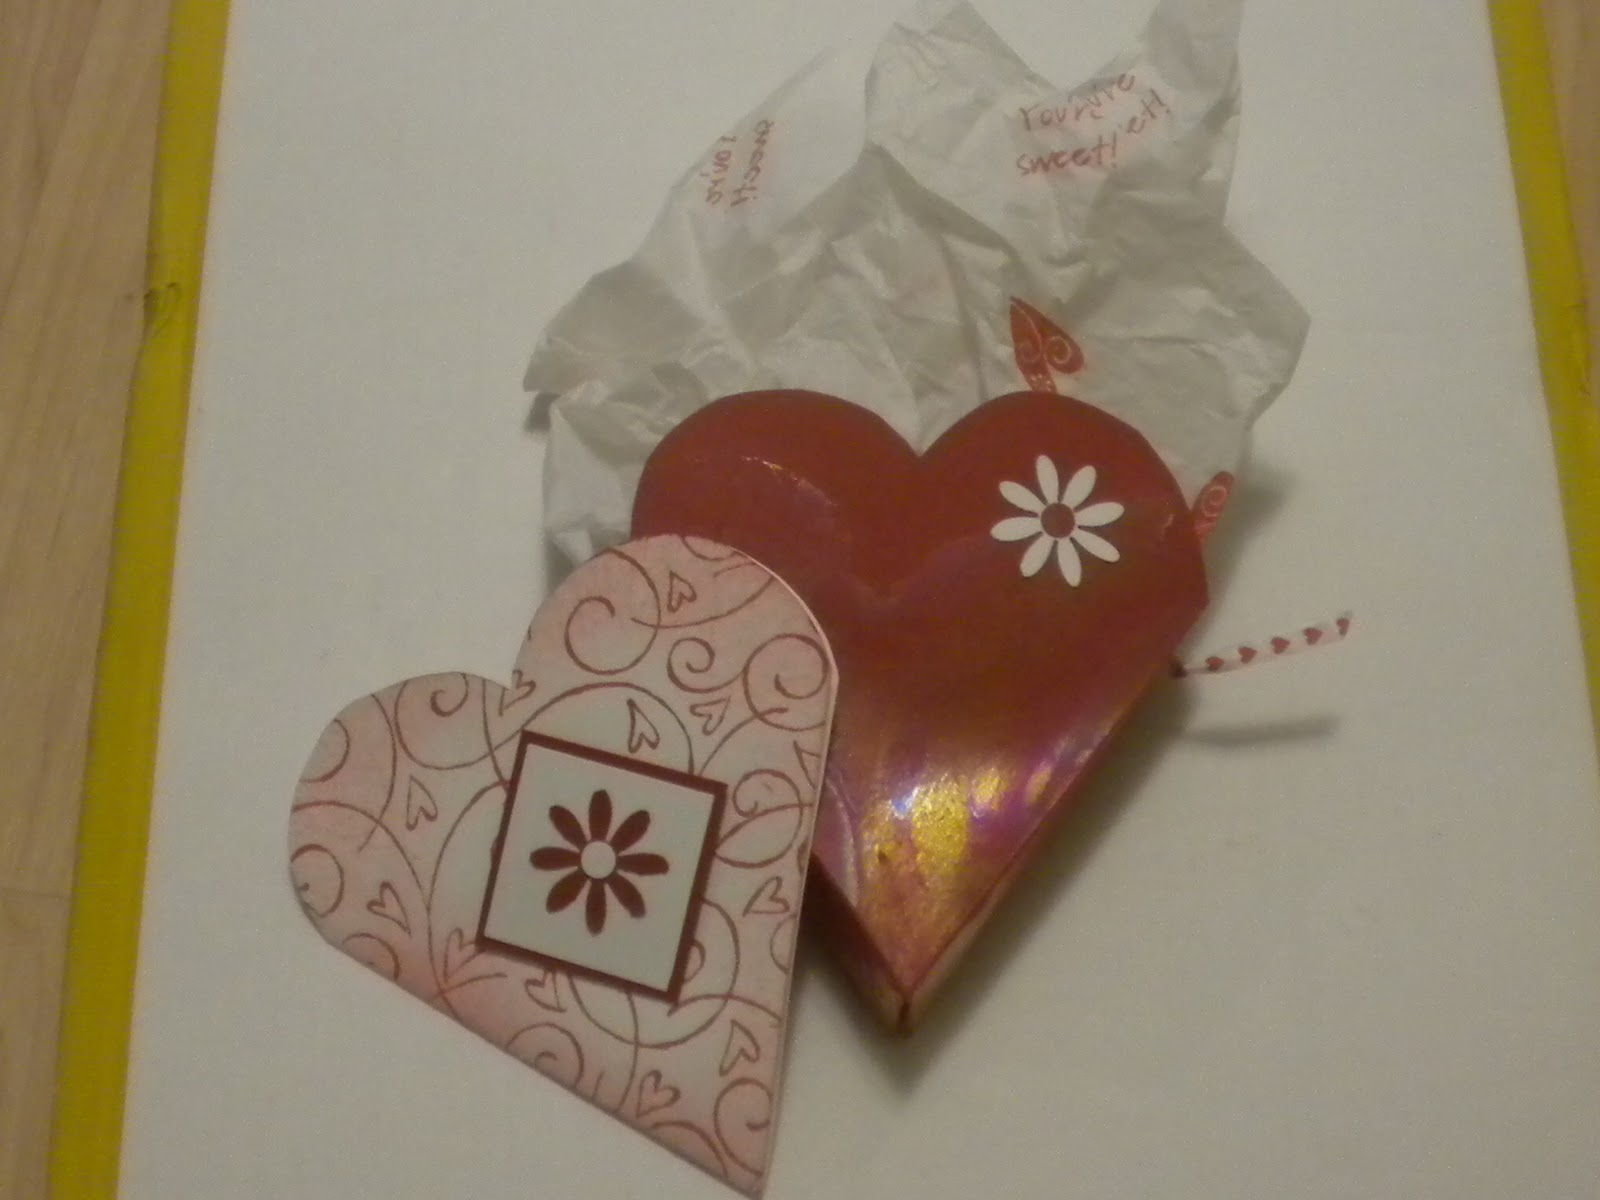 |
| I didn't make this one, but its cute so I had to share. I don't have a pattern, but you can just add a tab to the side of the hearts. Fold in the tabs, and glue them together to form an open topped narrow box. For an added touch, you can make a little card that fits right into the box. Stamp some tissue paper with a coordinating stamp, add a ribbon handle and some treats. |
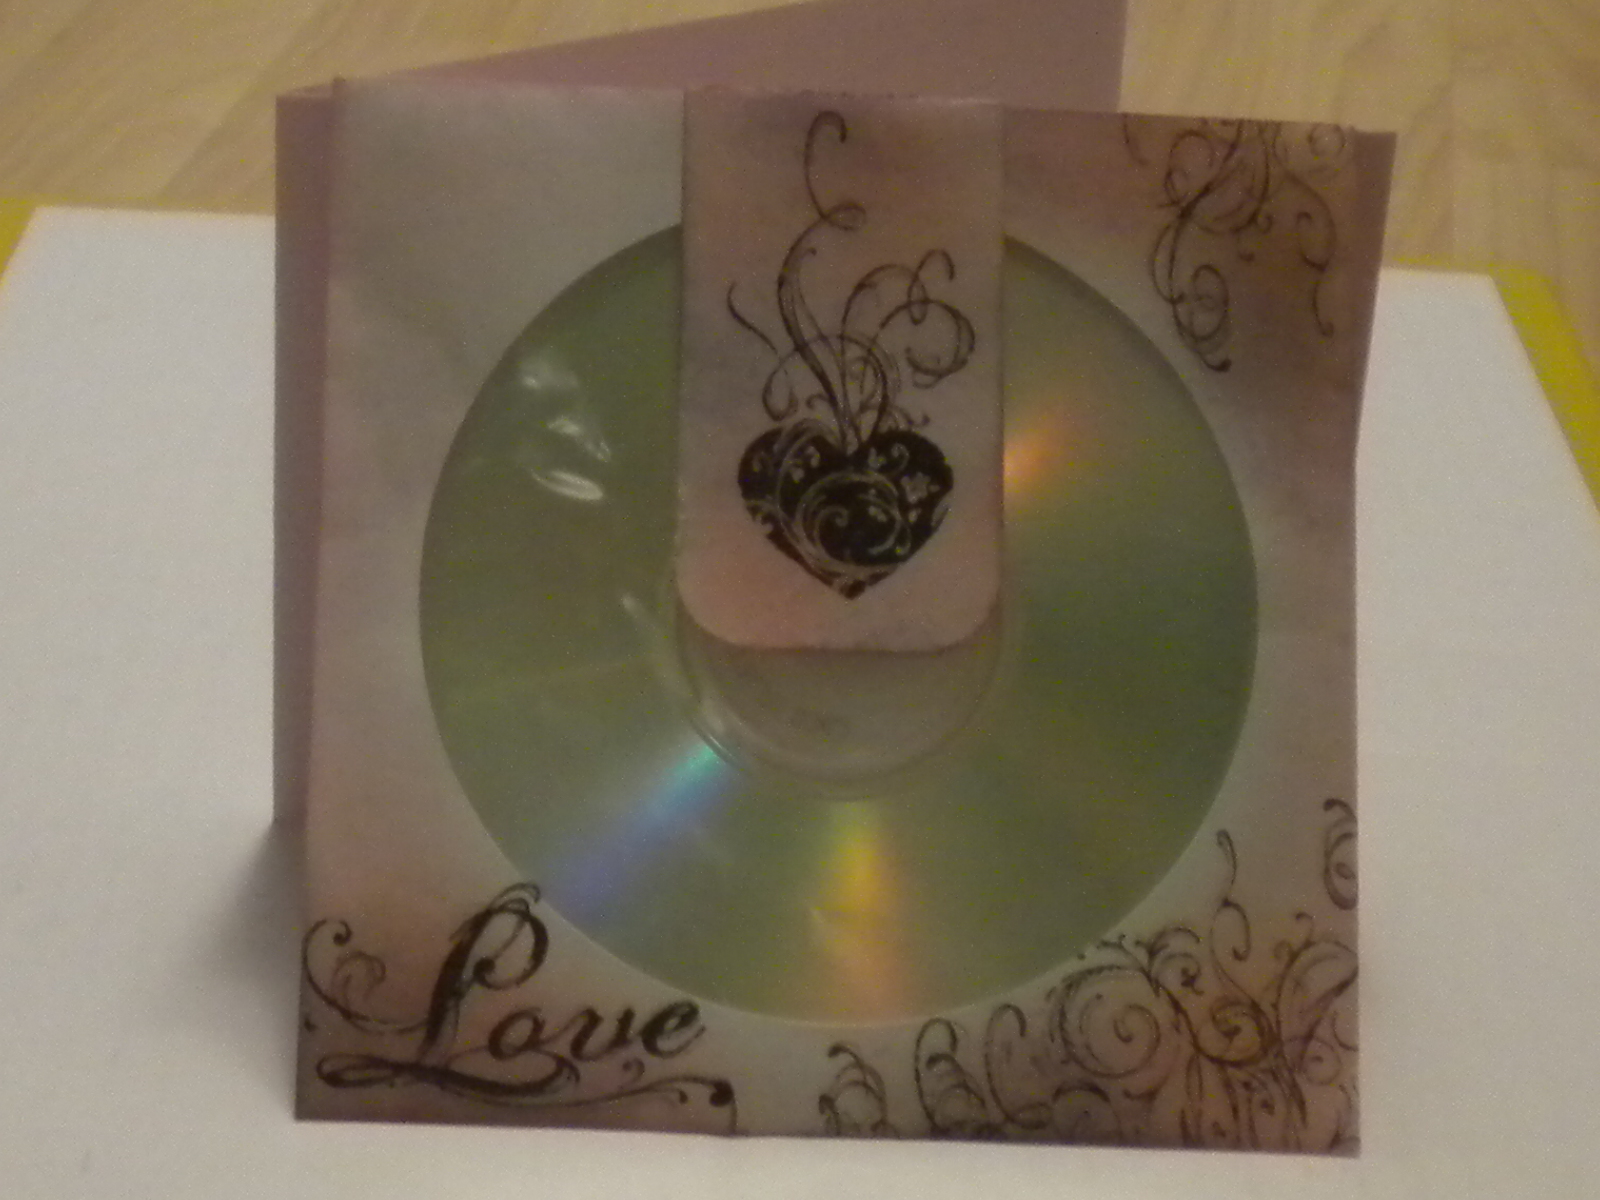 |
| This was a make'n'take I taught at our store. Its made from a cd envelope. I got the idea off the Internet, and they had a cookie in the envelope. You could also put a mix cd in the envelope, maybe love songs for your Valentine. I decorated the envelope by stamping and sponging. I added a paper tab (the piece in the center with the heart). In the picture it is leaning against a card, just so I could take a better picture. |
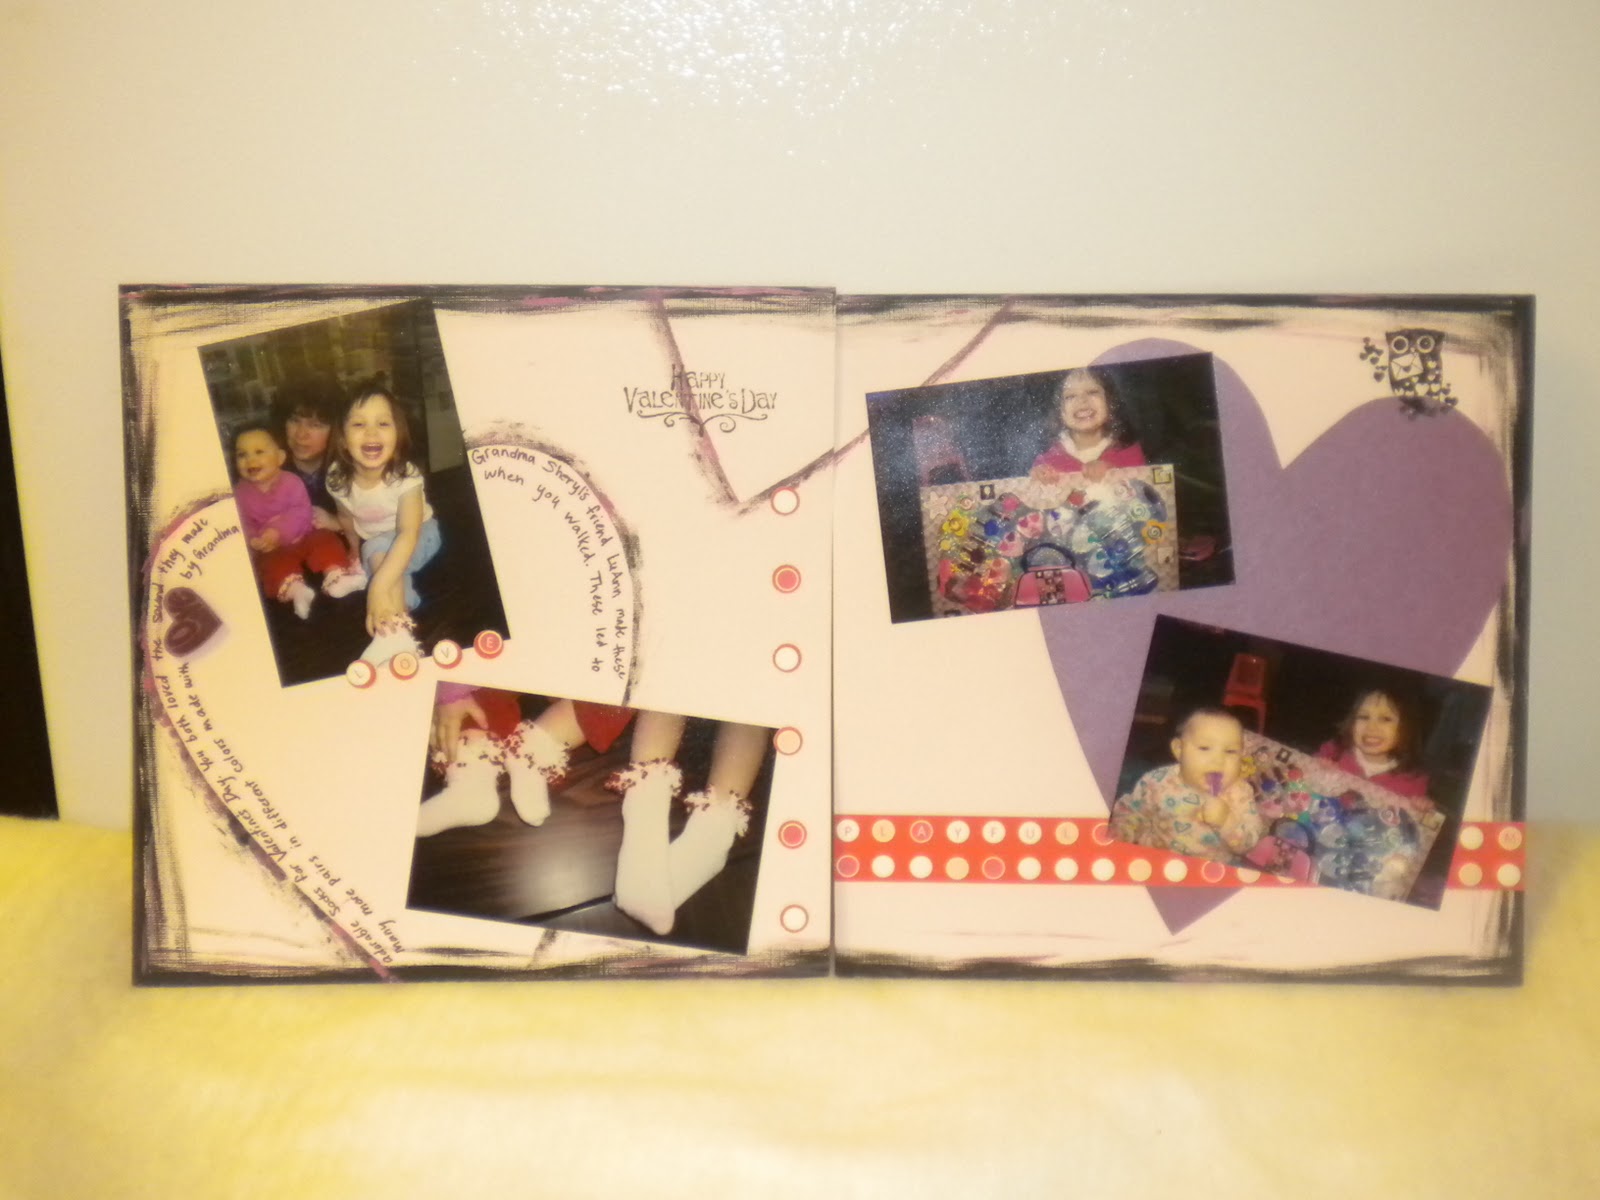 |
| This scrapbook layout isn't my best work, nor did it take much time. But it was so fun to make, and I love it still. I already had the paint out, and the idea popped into my head. I cut out a large heart from printer paper. I traced it onto the purple shimmery paper. Then I used acrylic paint to go around the pattern a couple more times directly on the paper. I painted the edges of the paper, too. I glued down the pictures, and then journaled around the inside of the heart. Added a few stickers and stamps, and it was done. I usually spend such a long time on my layouts that there is no way I will EVER be able to scrap all the pictures I want to. Sometimes its fun to just go crazy and have fun, and not worry about perfection. |
Wednesday, January 12, 2011
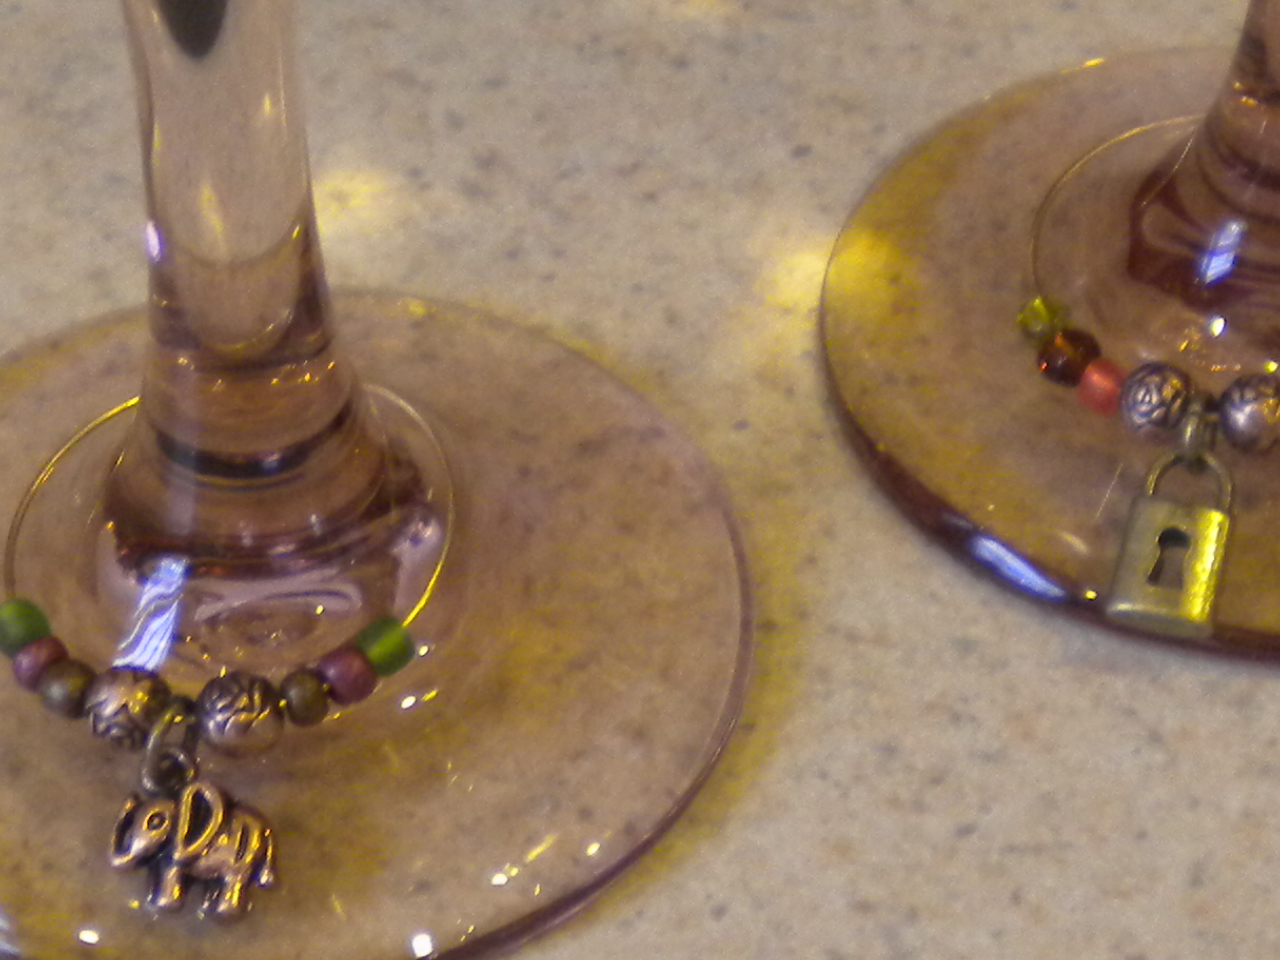
Wine Glass Candle
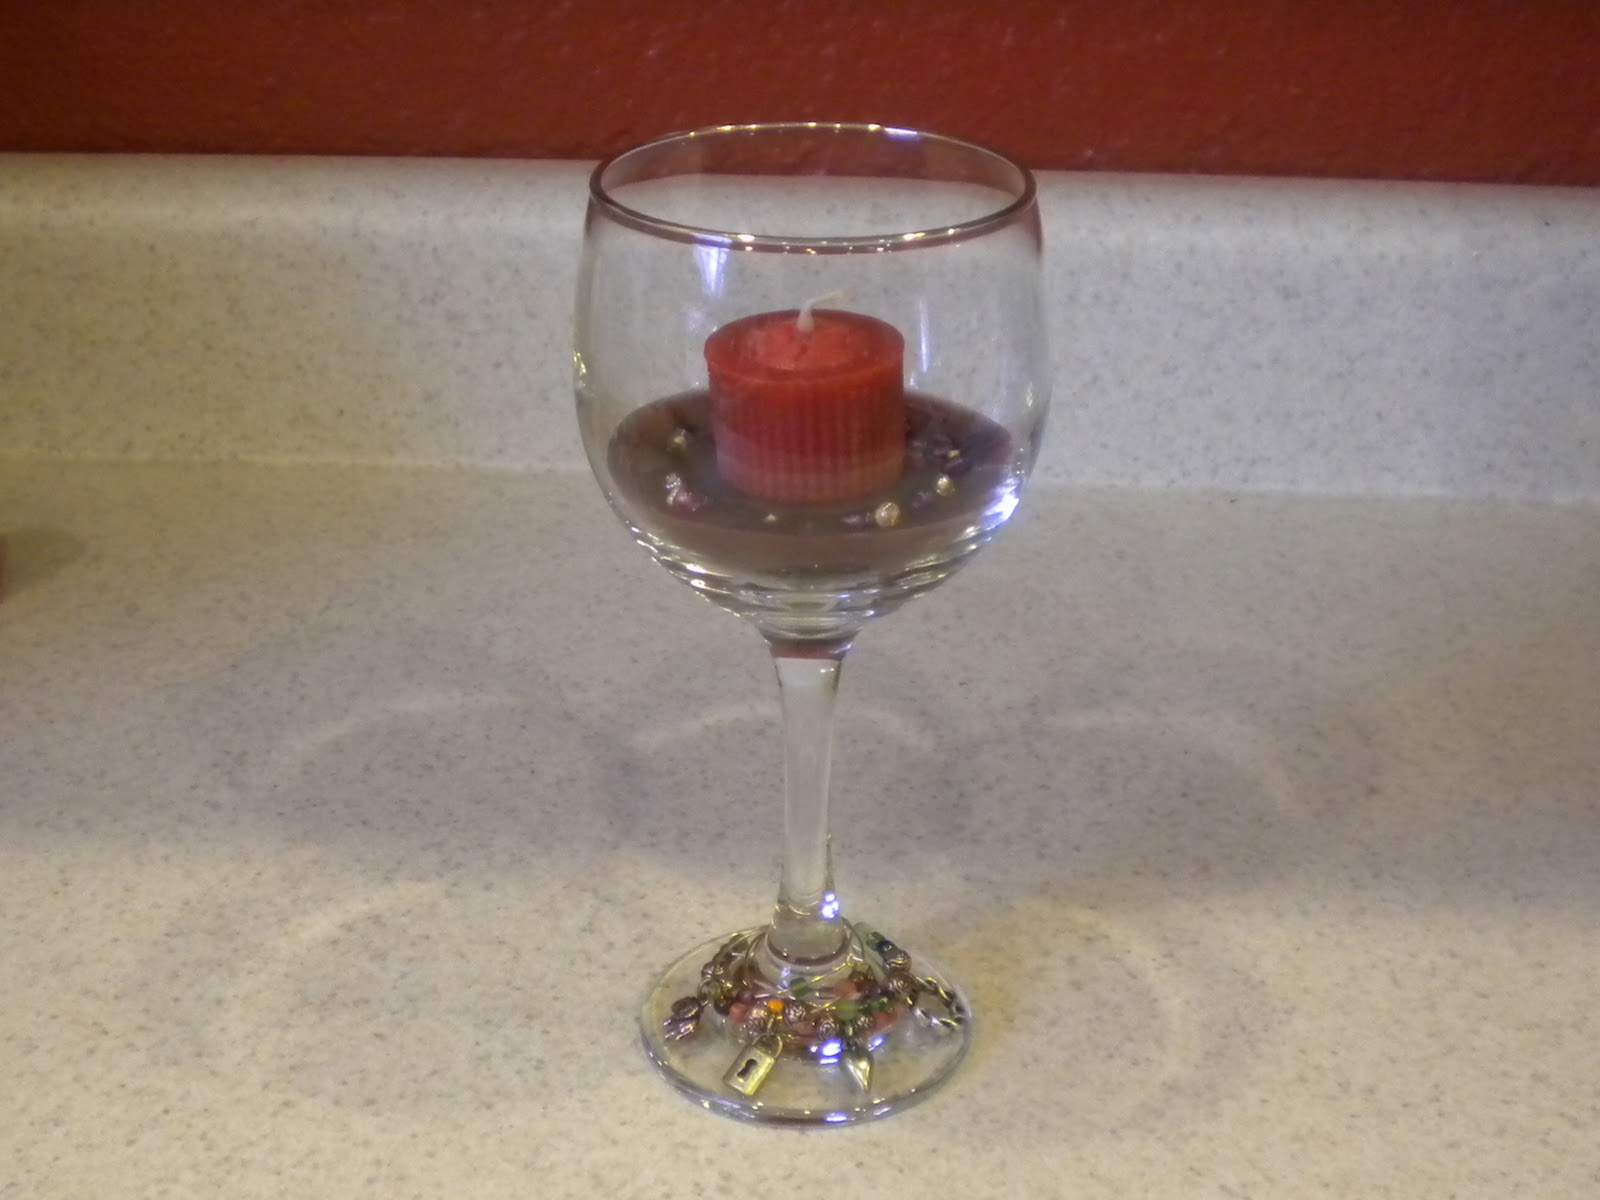 |
| This is my idea for a place to store the charms when they aren't in use. I got the glasses at the dollar store. There were lots to choose from. Make sure they are heat resistant, you don't want the glass to break while the candle is burning. I bought a pack of small candles, there was even wine scented candles, but I used cinnamon. I also bought a package of wax crystals. It is in the candle making section at the craft store. It is basically powdered wax. I set all the glasses in a row, and poured the wax evenly among the glasses. I preheated the oven to the 'warm' setting. I set the glasses on a cookie sheet, and put them in the oven. It took about ten minutes to melt the wax. I carefully removed the cookie sheet, and then let them cool for a couple minutes. Next, I placed the candle in the middle, and held it there until it stayed, about 30 seconds. I watched them until the wax just barely started to set. |
 |
| I sprinkled some of the beads I used to make the charms over the still warm wax. You need to watch closely because the beads won't stick if the wax sets too much. There are a few other ways you could create a candle in a wine glass. I did it this way because it was a last minute idea, and this was the most time and cost effective way. But, if I had more time and a bigger budget, I would use the candle gel. It has the appearance of a liquid, and you can add any color or scent to it. You could make it look just like a glass of wine! |
 |
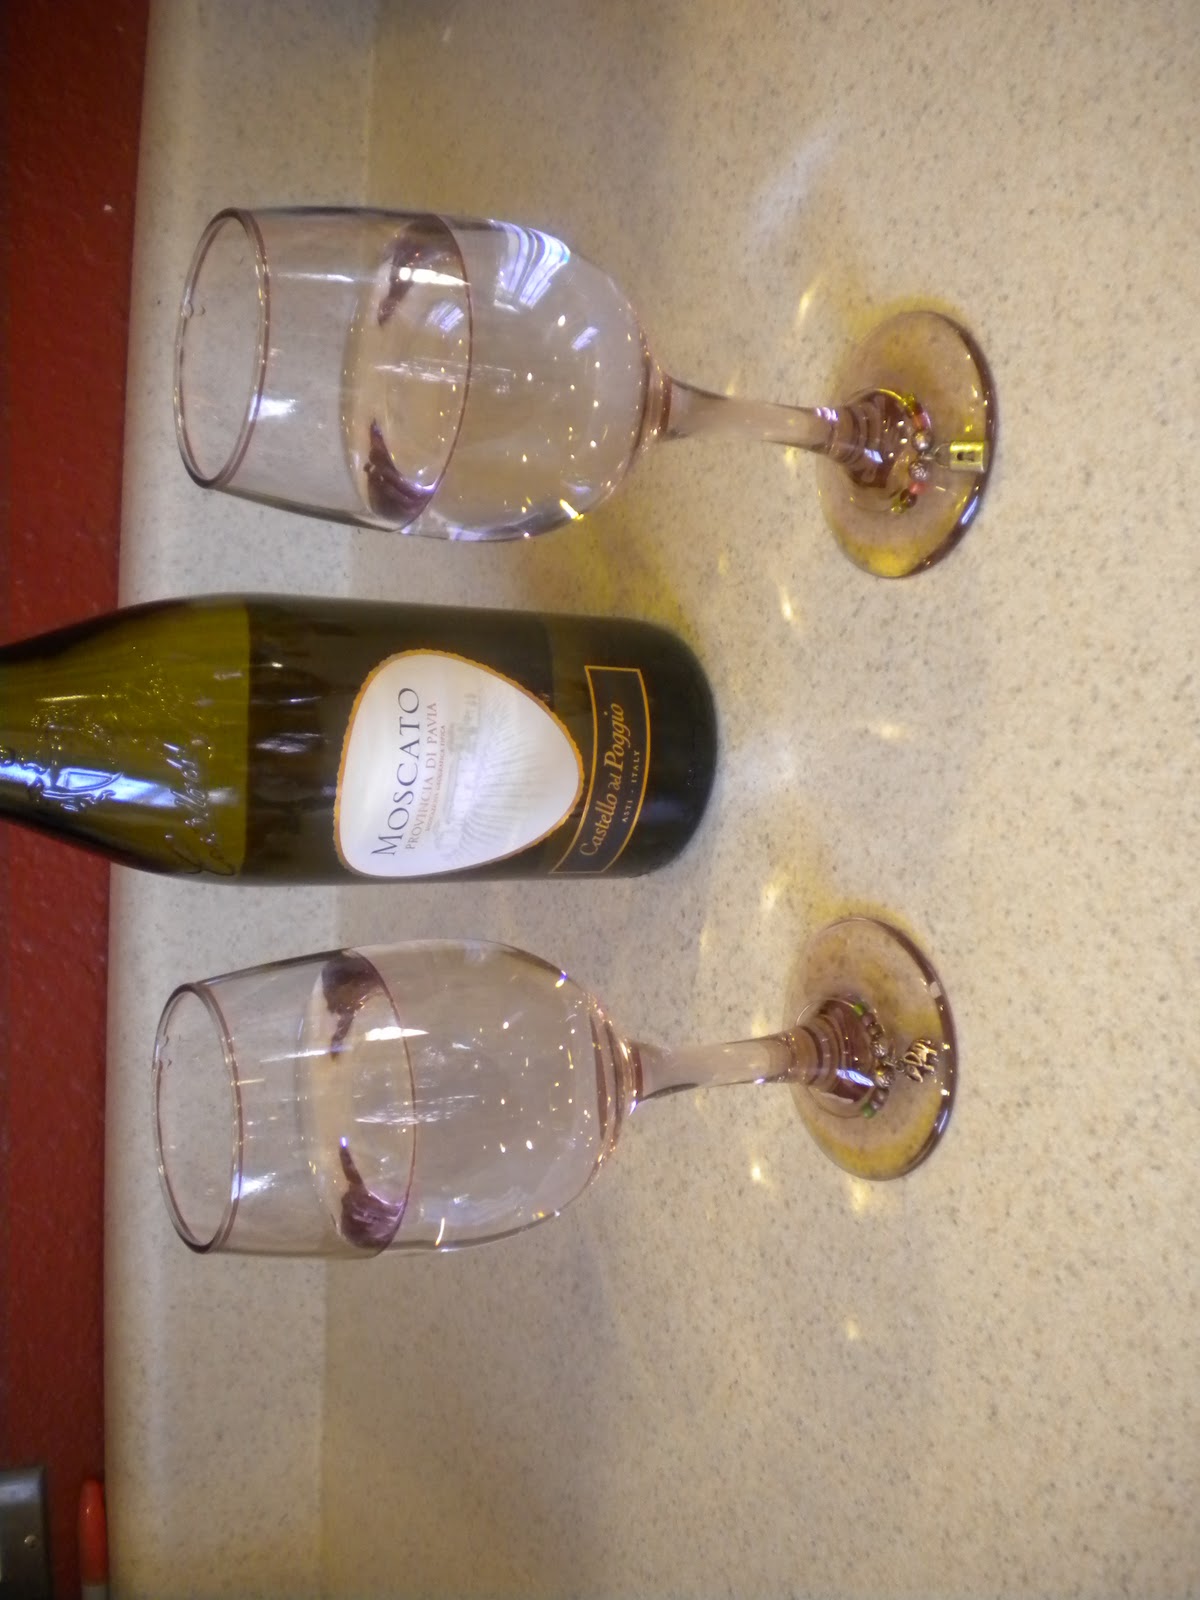
| After the candle is set, attach all the charms to the stem. Now there is a pretty place to store the charms when they aren't being used. By the way, I have always liked all the wine paraphenalia, but not the wine. The glasses, the racks, the charms, its all beautiful. But the taste of wine is not something that I enjoy. But I recently discovered one that I love. Its called Moscato, and it is very sweet. The lower the alcohol content, the sweeter the flavor. So if you like sweet wine and haven't tried this, you should! Most of the popular brands make it, like Barefoot Bubbly and Sutter Home. Leave a comment if you have a favorite wine, I'm just discovering the world of wine. |
Tuesday, January 11, 2011
Wine Charms
 |
| I made these wine charms for most of my friends and family on my Christmas list. They were fun and inexpensive, both important qualities when you are making a lot of something! You don't need to be a bead expert to assemble the charms, you just need one tool, flat nose pliers (pictured below). |
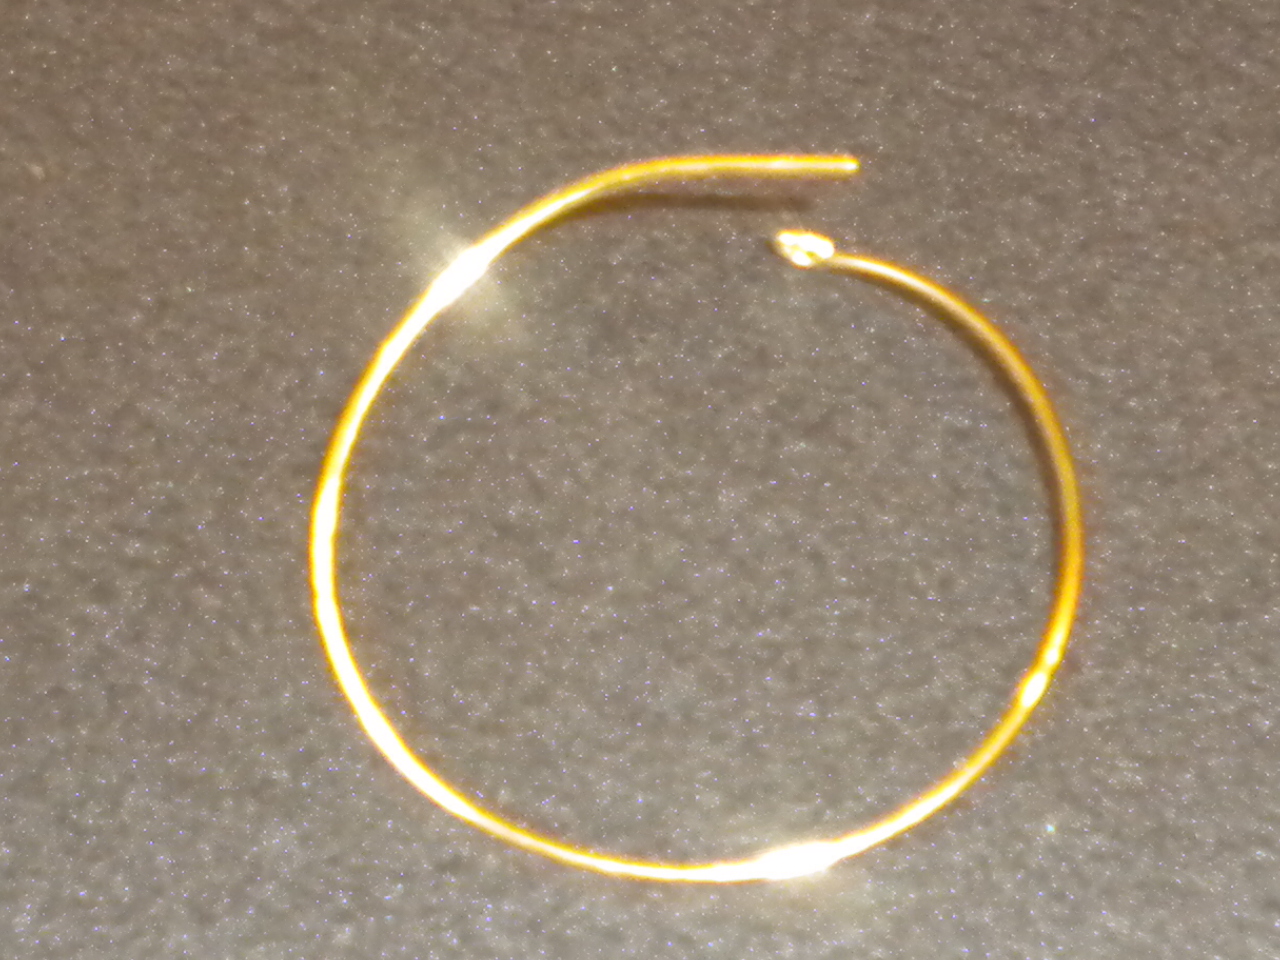 |
| Start with an earring wire like this one. They come in gold, silver, copper, and sometimes you can even find other colors. Make sure the beads and charm are waterproof so you can wash them between uses. Thread your beads and charm onto the wire. Get creative with your charms. You can personalize the charms with monograms, favorite colors, or themes. For example, if you are giving the charms to someone who loves the ocean, use seashell charms. You can find charms in many different themes, if it isn't at your local craft store, check online. Browse the internet for inspiration. You can use paper punches and a jump ring to create disposable charms to match the theme of your party. Add to a paper charm by using rubber stamps to dress it up. |
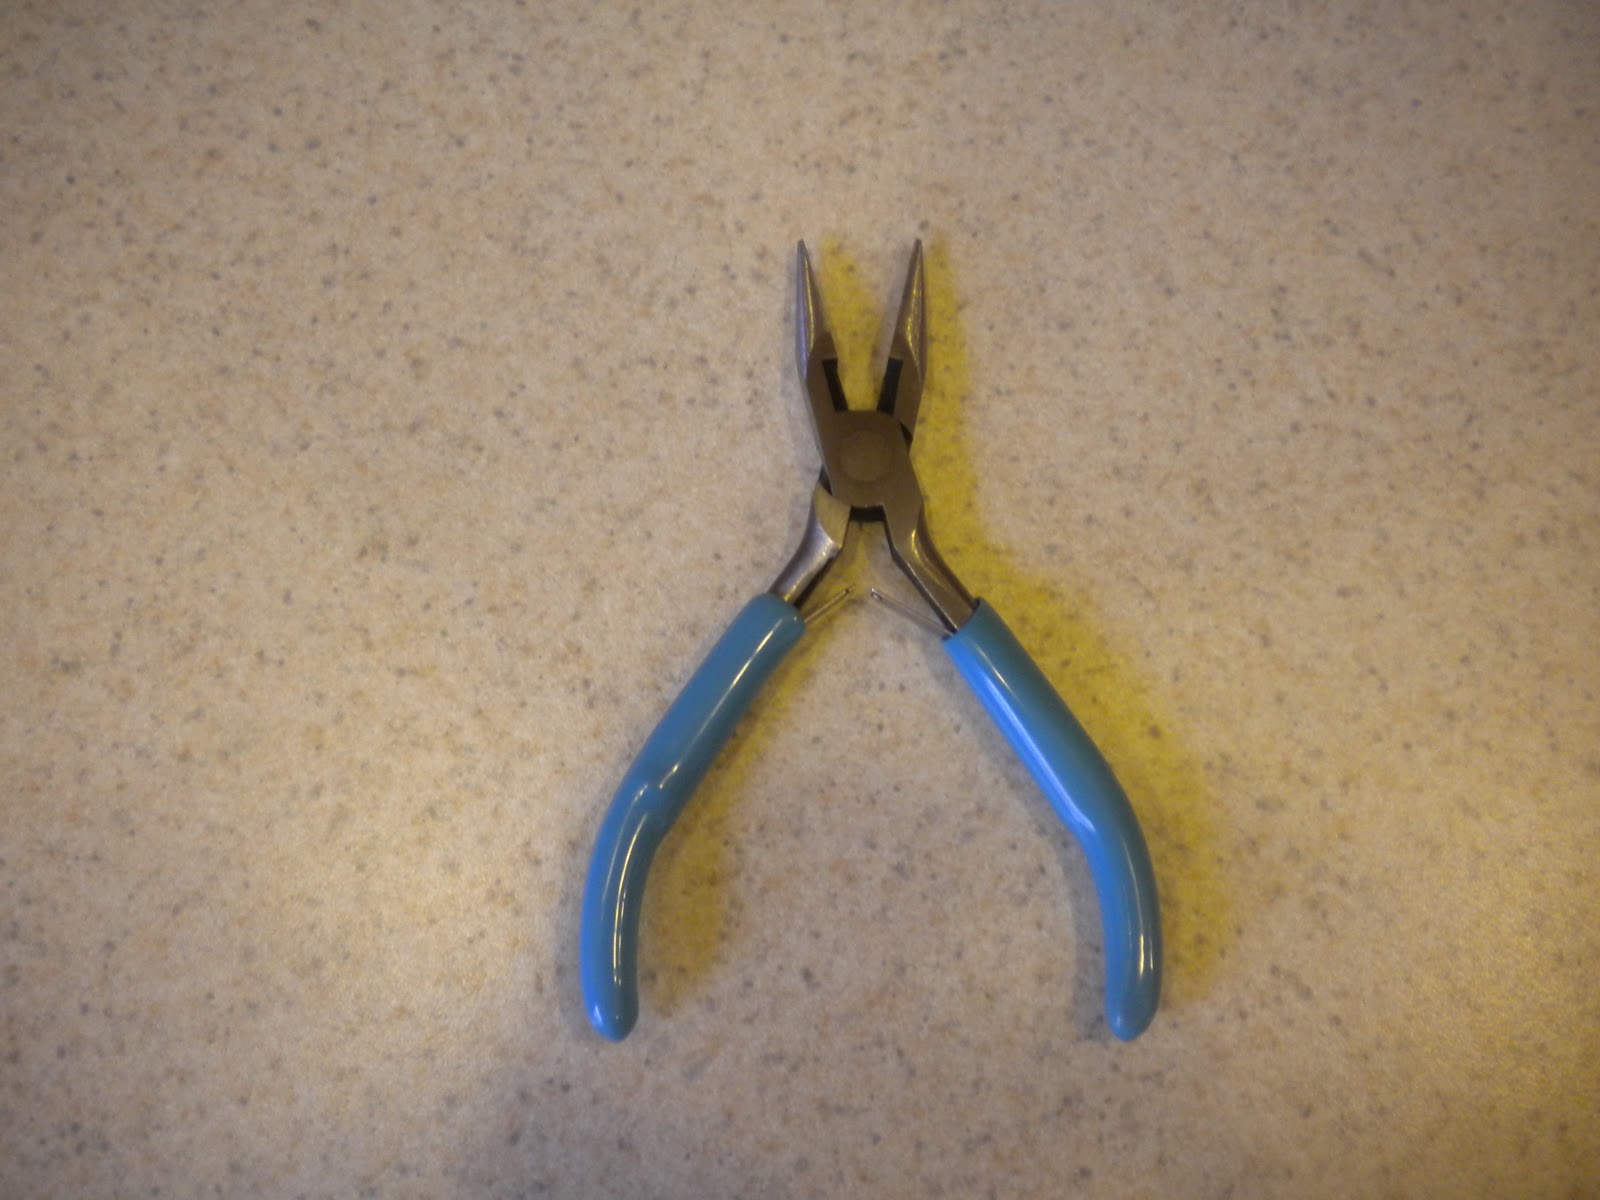 |
| These are the pliers I used. It came in a set in the beading section. I also have another that I |
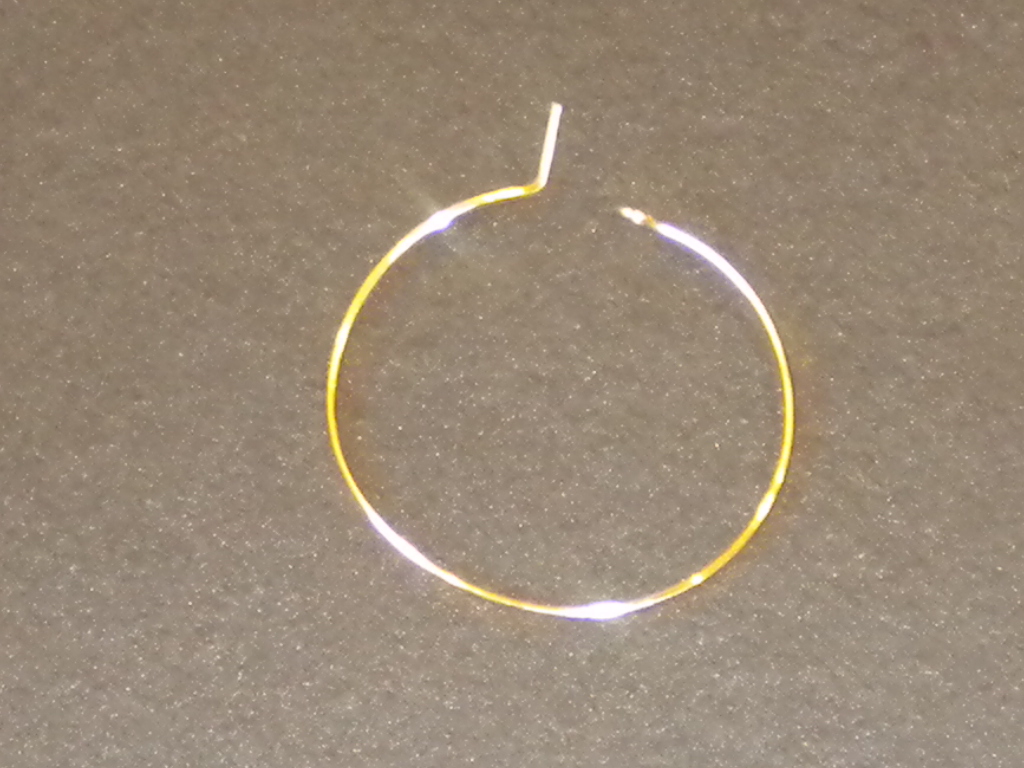 |
| After adding your beads, bend the end of the wire up like this. Make sure to do this AFTER adding the beads, it will be impossible to put the beads on with it bent. You can straighten out the wire if you missed a step, but its hard to make it look smooth again. If the wire doesn't stay in the loop pull it out a little to add some tension. |
 |
| This is my idea for a pretty place to store the charms when not in use. Its a whole different project, and the instructions are soon to come. You can again search the internet for ideas on how to package them. There were lots of cute ideas, including punching holes along the bottom of a card and attaching the charms. Another idea I liked was to use little round tins with windows in the lid. You can get these at the craft store. I found tiny boxes at the Dollar Store, made for small wedding favors, that came in a pack of 12. I use those little boxes for giving earrings away, too. They are the perfect size. |
Saturday, January 8, 2011
CD Folder Album
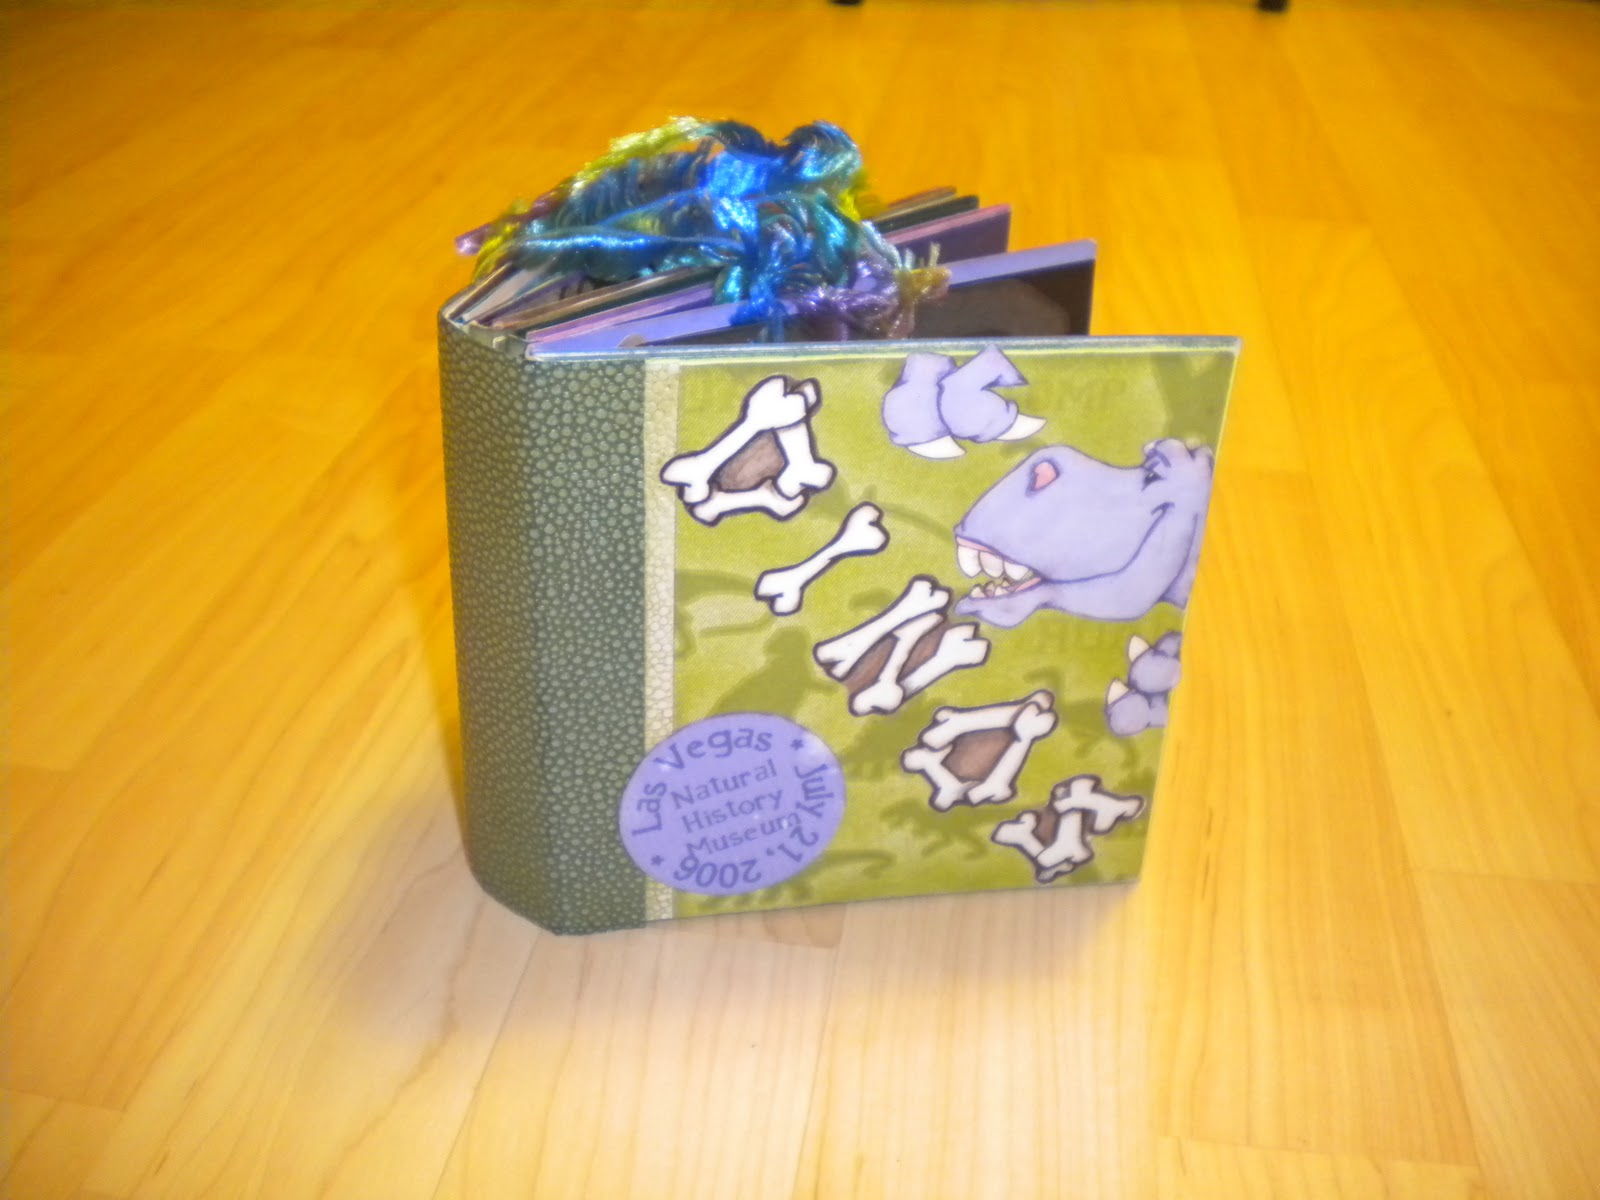 |
| These albums are really fun to make. They make great gifts, too, and go together much quicker than a traditional album. My mom made this album for my daughters, after we went to the dinosaur museum. You can simply pick a set of paper with matching stickers, tabs, etc. Or, this can be a fun challenge to use up all those cute little scraps you were saving for the perfect project. |
 |
| You start with cd folders like this one. They are from ULINE. They are called CD Literature Folders. They come in a case of 125 only. But don't worry, you can split it with friends. Or hang on to them for yourself, you might be suprised how addicting they are! You can make the album whatever size you like. Three to four folders works great, though. Measure the folder, open, and cut out one paper this size for every two folders. Use these to join the folders, glue the paper to the back of one folder and to the front of the next. To make the spine, measure the width, and leave enough to wrap around the edges. If you can find fabric paper, this works the best. It holds its shape, yet bends with the book as it is looked at. Next, you will cut the paper for the pages. There is lots of room for creativity and expanding the size of your book by making flaps (see below). There are two ways to color the edges of the folders. (They will show a little bit after you attach your paper.) You can color them now with sharpies or chalk ink matching the paper you will be using, for a clean look. Or, you can paint them after the paper is added, for a more shabby chic look. |
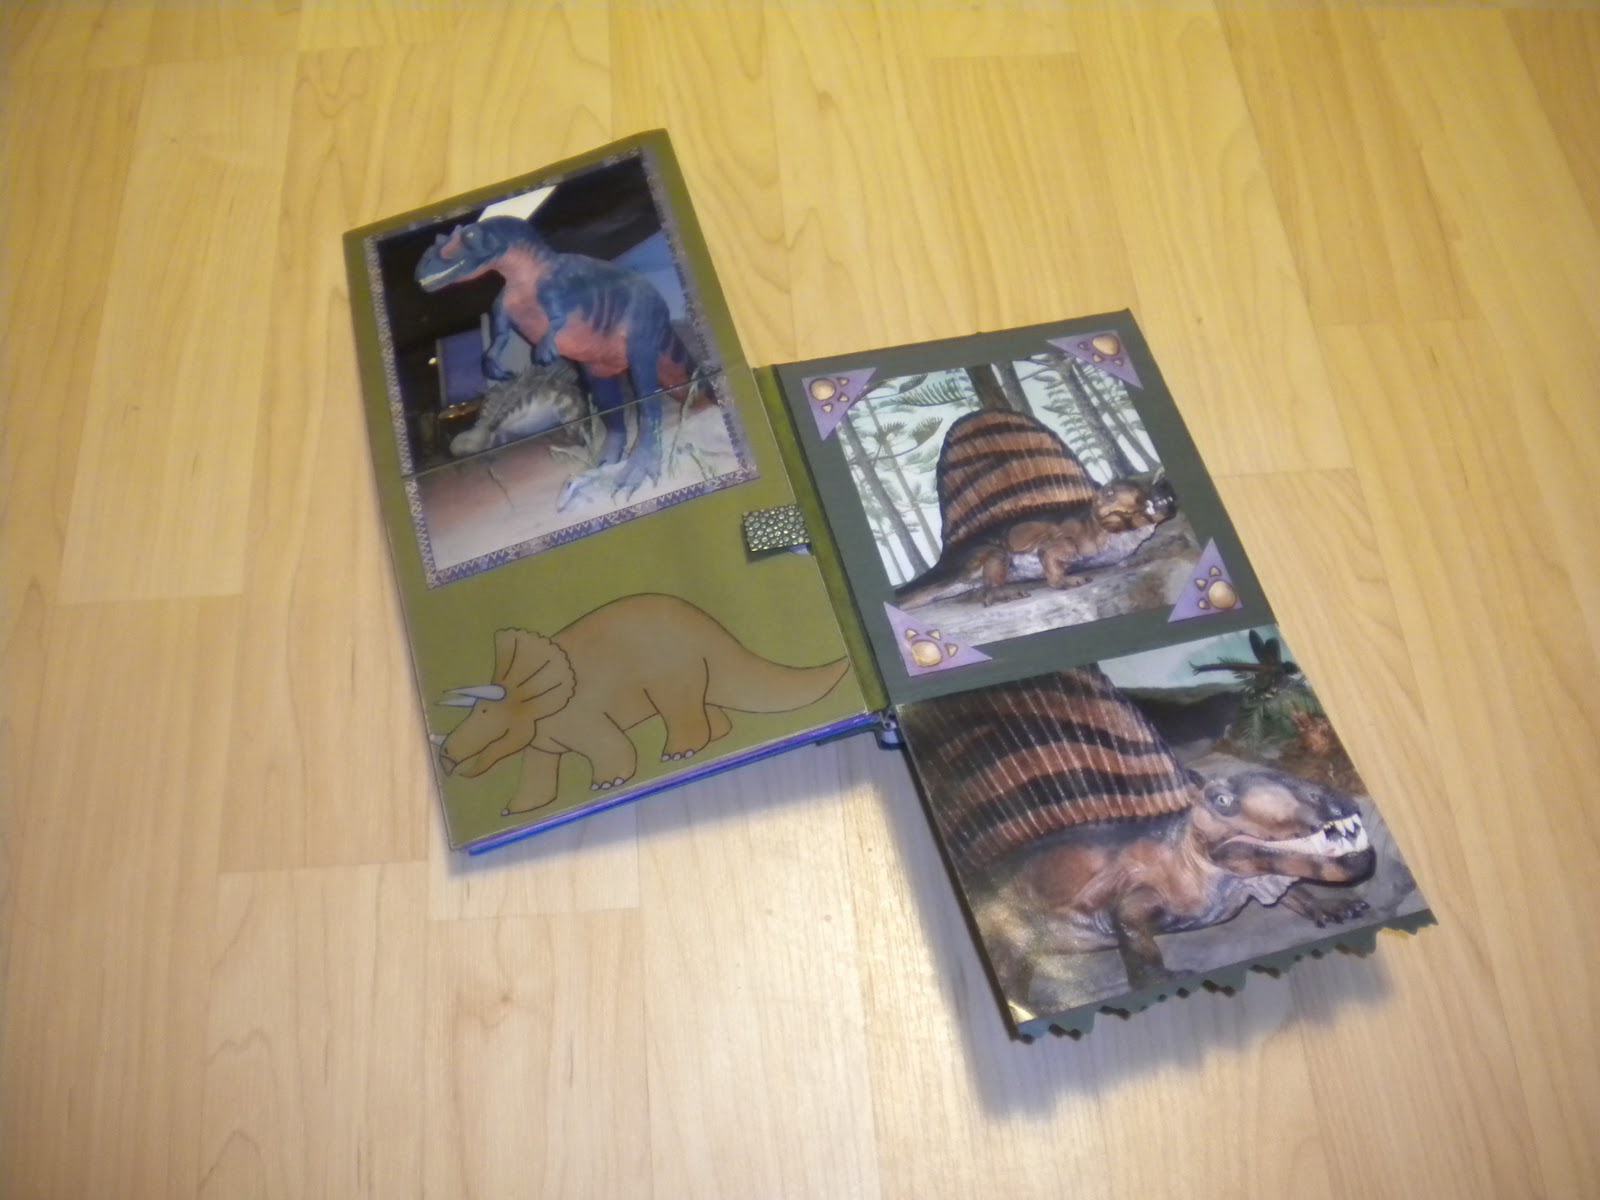 |
| You can see that longer sheets of paper were used here to make flaps. The pockets all have tags in them, too. As you are assembling your book, think about where you might like to add 3-d elements like brads. This is sometimes easier to do before attaching the paper. Be sure to add some funky edges here and there with your punches or scissors! |
 |
| You can see more pages with flaps here, one open and one closed. |
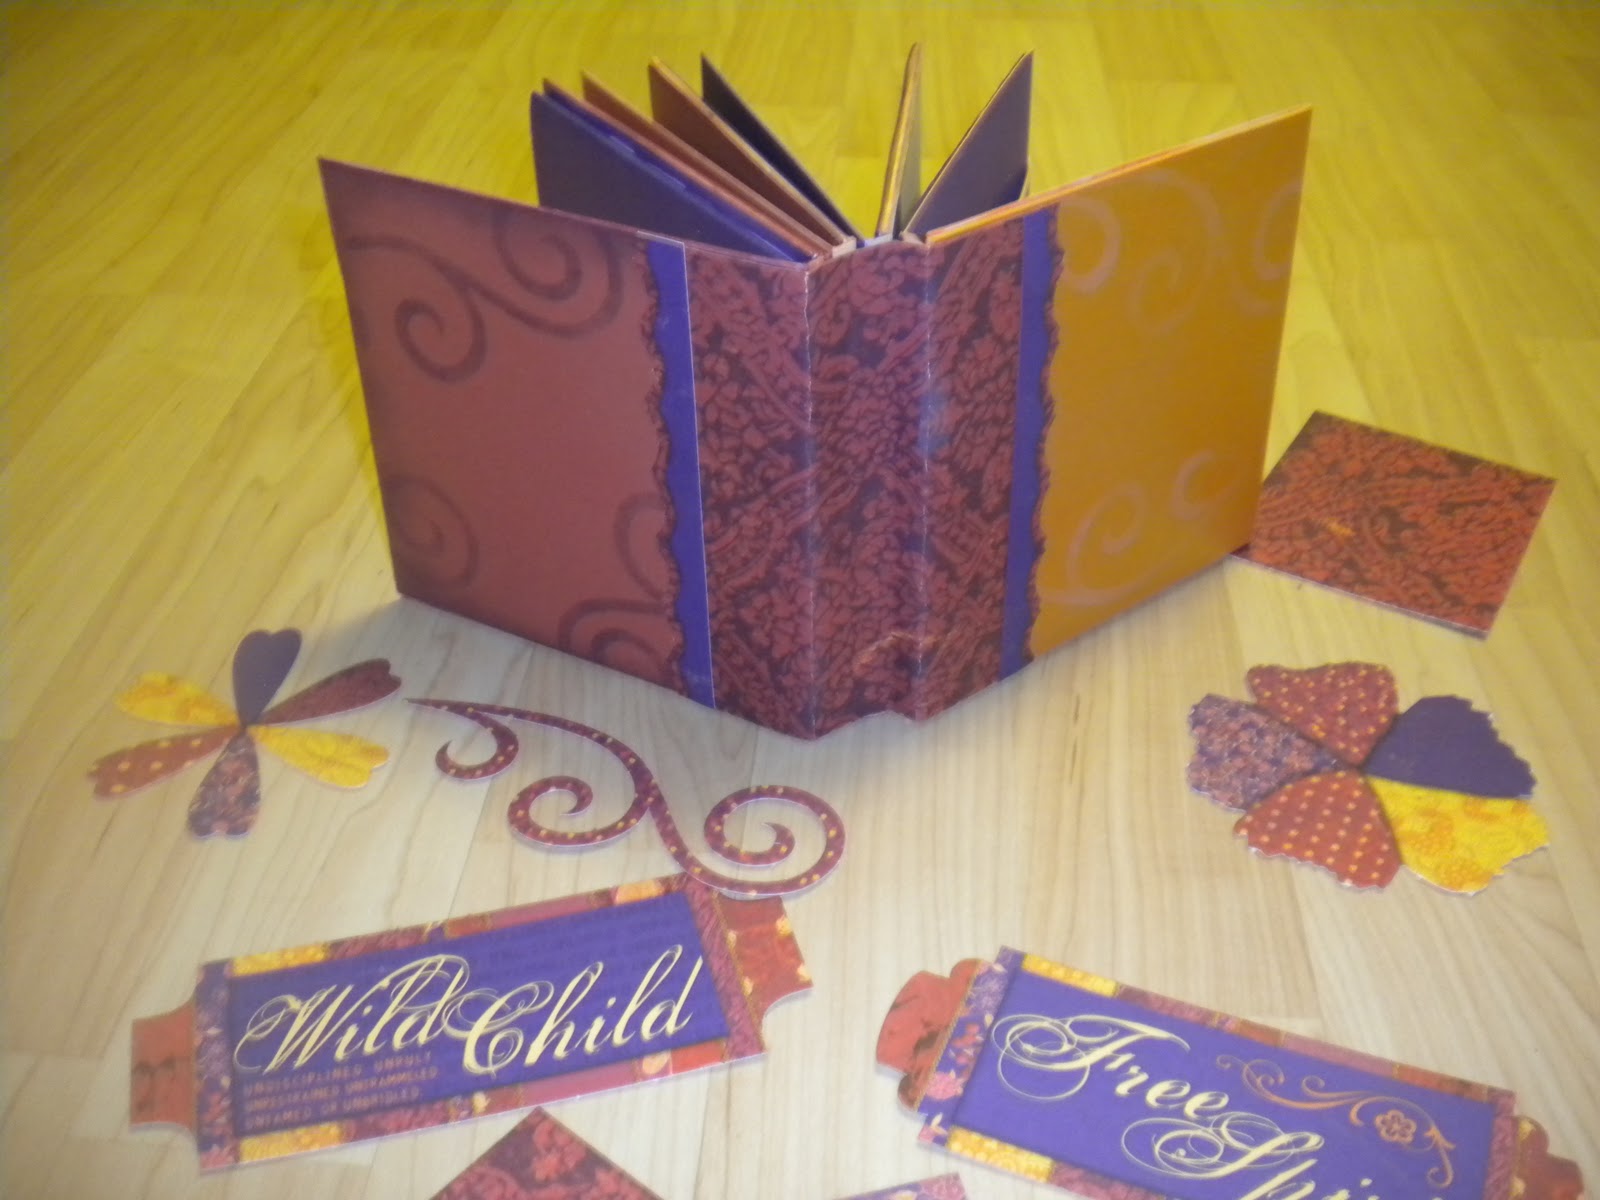 |
| This is the album I am working on right now. It will not be truly finished for a long time, as I am using it for a journal. I am filling it with my thoughts on spirituality and religion. Whenever I have a thought, quote, or even a picture, I will tuck it somewhere in the book. You could also use them one at a time to make a special birthday card. Maybe a love song mix cd for Valentine's day would be fun, a homemade cd in a handmade case. Have fun! |
Subscribe to:
Posts (Atom)